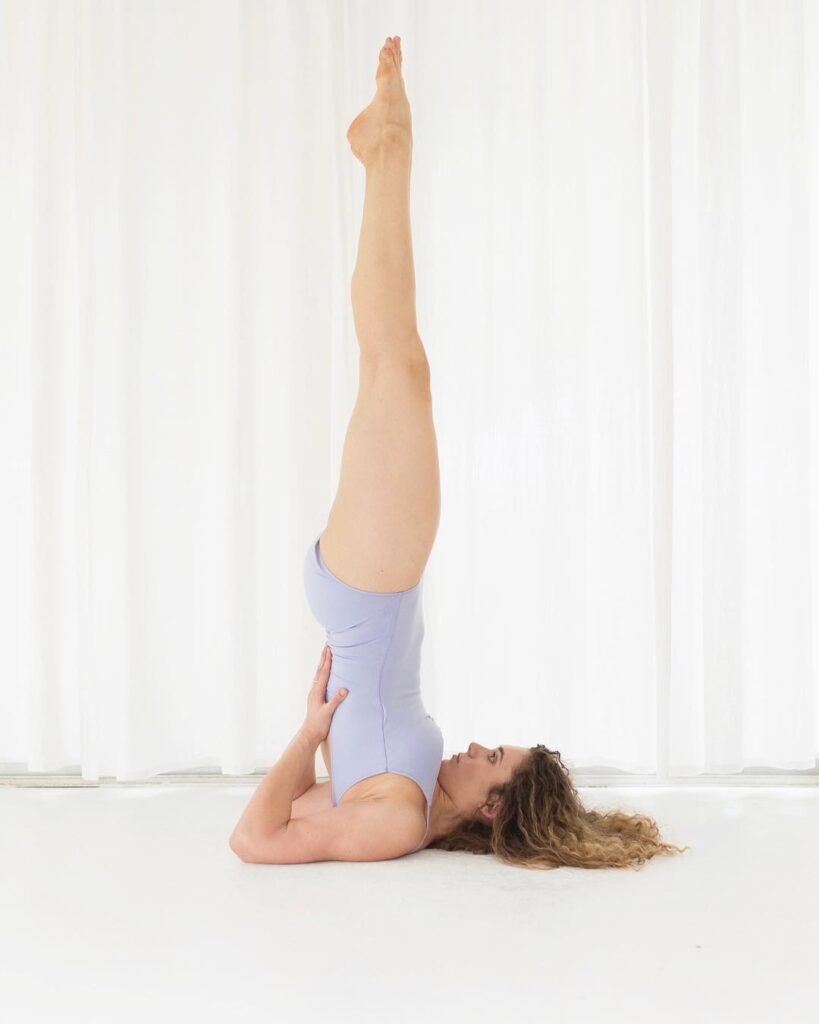
Salamba Sarvangasana, also known as Shoulder Stand Pose, is one of the first beginning poses of inversion pose series. Where Headstand has the shoulders flexing forward, Shoulder Stand has them extending, with your hands supporting your back. Additionally, your neck is flexed.
As with other asanas, there are several subplots to the story of Salamba Sarvangasana or Sarvangasana — an inversion pose, a shoulder stretch pose, and a chest opener pose.
This levers your chest open — one of the great hidden benefits of this yoga pose. Salamba Sarvangasana (Shoulder Stand Pose) also shares many of the potential benefits of other inversions, including improved your venous return and cardiac output and increased parasympathetic outflow (temporarily lowering the heart rate and blood pressure).
Meaning
Salamba Sarvangasana derived from the Sanskrit name that comes from five words — sa + alamba + sarva + anga + asana:
- “sa” = “with”
- “alamba” = “support”
- “sarva” = “all”
- “anga” = “limb”
- “asana” = “pose or posture”
It is essentially translates to “All limb with support pose”. “Support” means that the hands are on your back, holding up your torso while the legs are overhead. The importance of Salamba Sarvangasana (Shoulder Stand Pose) cannot be emphasized. It is one of the greatest boons given to humanity by our ancient sages.
The science behind the Salamba Sarvangasana (Shoulder Stand Pose)
Salamba Sarvangasana (Shoulder Stand Pose) is the “mother or queen of Asanas”. Just as a mother strives for peace and happiness in the house, similarly this posture strives for harmony and happiness of the human system. It is the panacea for the most common diseases. There are many endocrine organs or ductless glands in the human system that bathe in the blood, absorb nutrients from the blood and secrete hormones for the proper functioning of a balanced and well-developed body and brain. If the glands fail to function properly, the hormone is not produced and the body begins to deteriorate. Surprisingly many asanas have a direct effect on the glands and help them function properly.
Sarvangasana does this for the thyroid and parathyroid glands located in the neck region, as their blood supply increases due to firm chinlock. Also, as the body is upside down, venous blood flows into the heart without any pressure by the force of gravity.
Healthy blood is allowed to circulate around your neck and chest. As a result, individuals suffering from breathlessness, palpitations, asthma, bronchitis and throat diseases are relieved. As the head remains firm in this inverted position, and its blood supply is controlled by the firm chinlock, the veins calm down and the headaches — even the old ones — disappear.
Continuous practice of this asana removes colds, colds and other nasal disorders. Due to the soothing effect of posture on the nerves, people suffering from high blood pressure, irritation, anger, nervous breakdown and insomnia are relieved.
Changes in physical gravity also affect the abdominal organs so that the bowels move freely and constipation disappear. As a result, the system is freed from toxins and the person feels full of energy. Asanas are recommended for urinary disorders and uterine displacement, menstrual discomfort, hemorrhoids and hernias. It also helps in relieving epilepsy, reduced vitality and anemia.
It would not be an exaggeration to say that if a person regularly practices Sarvangasana, he will experience new power and power, and he will be happy and confident. New life will flow in him, his mind will be calm and he will experience the joy of life. After prolonged illness, practicing this asana regularly twice a day brings back the lost vitality.
The Salamba Sarvangasana Chakra activates the abdominal organs and relieves those suffering from stomach and intestinal ulcers, severe abdominal pain, and colitis.
Information
| Also known as: | Sarvangasana, Salamba Sarvangasana, Shoulder Stand Pose, Kandrasana, Supported Shoulderstand Pose |
| Sanskrit name: | सालम्ब सर्वांगासन |
| IAST: | Sālamba Sarvāṅgāsana |
| Pronunciation: | shah-LUM-bah sahr-vahn-GAH-sah-nuh |
| Level: | Intermediate |
| Total time: | 30 to 60 seconds |
| Drishti: | At the toes |
| Chakra: | Sahasrara Chakra, Ajna Chakra, Vishuddha Chakra, Manipura Chakra |
| Stretches: | Shoulder, neck |
| Strengthens: | Shoulder, spin, back |
| Counterposes: | Rest on your back |
| Preparatory Poses: | Sethu bandha Sarvangasana, Halasana, Hero Pose |
| Follow-up poses: | Wheel pose, Corpse pose, Supported headstand |
| Contraindications: | High blood pressure, Neck or disk injury, Menstruation, First trimester of pregnancy |
Benefits of Salamba Sarvangasana (Shoulder Stand Pose)
Since the Salamba Sarvangasana (Shoulder Stand Pose) is called the ‘Mother of all Asanas’, it actually benefits our body in many ways. There are very few yoga postures that benefit you so much. The various physical and mental benefits this yoga pose are listed below:
- Physical Benefits:
- Stimulates thyroid, parathyroid, and prostate function
- Stretches and strengthens the neck, shoulders, and rhomboids
- Reduces varicose veins
- Improves circulation
- Relieves sinus pressure
- Helps relieve menopausal discomfort
- Alleviates insomnia
- Mental Benefits:
- Calms the mind
- Relieves mild depression
- Relieves stress
Step-by-step Salamba Sarvangasana (Shoulder Stand Pose)
- Start by stretching your shoulder flexors at the front of the chest and the arms by using the same facilitated stretches you used in Purvottanasana (Reverse Plank Pose). Take care not to hyperextend your wrists in this preparation.
- Try the supported variation of the pose by using a chair against a wall and a blanket or bolster under your shoulders. In the beginning, rest your feet against the wall and grasp the legs of your chair to open your chest. Then take your feet and legs straight up. These variations of Salamba Sarvangasana (Shoulder Stand Pose) can be combined with other restorative yoga poses, such as Shoulder supported bridge pose and Legs up the wall pose.
- As you progress to the free-standing variation, roll up from flat on the back or begin in Plow pose (Plough pose) and draw your knees into your chest; then come into the pose by extending your legs and leaning into your hands.
- You can also place a belt around your thighs to tether your legs together. Open your soles of the feet upwards by extending your toes and everting your ankles.
- Brace your back with your hands to ease out of the pose. Roll onto your back and rest there for a few seconds to allow your cardiovascular system to readjust.
Anatomy Engaging Techniques
Step-1
- Extend your thighs and arch your back. Tuck your tailbone under to engage your gluteus maximus and draw your thighs back slightly, allowing your weight to shift into the hands.
- Contract your erector spinae and quadratus lumborum to gently arch your back.
- Visualize your gluteus minimus on the side of your pelvis activating to stabilize the ball (head) of the femur in the socket.
Step-2
- Flex your elbows to press your palms into the back. Lean into your hands and contract the biceps and brachialis muscles to support your weight and expand your chest forward. This is a key action in this yoga pose.
- Press the backs of your arms into the mat by engaging the posterior deltoids. This aids to stretch your muscles at the front of your chest and it produces reciprocal inhibition of your anterior portion of the deltoids. Your teres major synergizes this action.
- Externally rotate your shoulders by activating your infraspinatus and teres minor muscles of your rotator cuff. Your posterior deltoids also assist in rotating your shoulders.
- Then engage your supinator muscles of the forearms to press the outer edges of your palms into the back. Your biceps are also a supinator, so this action further aids to open your chest.
Step-3
- Balance the actions of your gluteus maximus, quadratus lumborum, and erector spinae by activating your hip flexors and abdominals. A cue for contracting your hip flexors is to bring your legs forward slightly.
- Then balance flexion and extension of your thighs so that your legs are held straight up in the air. This serves to stabilize your pelvis. Note how your abdominals connect your pelvis and your ribcage.
- Gently engage your rectus abdominis to balance your back extensors and stabilize your spine.
Step-4
- Firmly contract your quadriceps to straighten your knees. Synergize this action and stabilize your knees by engaging your tensor fascia lata. This has the added effect of internally rotating your thighs and bringing your kneecaps back to a neutral position.
- Note that your kneecaps tend to rotate outward due to the action of your gluteus maximus described in Step-1. The cue for engaging your tensor fascia lata is to imagine pressing the outside edges of your feet against an immovable object. While your legs do not come apart, this stimulates contraction of your abductor component and accesses the secondary action of your tensor fascia lata, internally rotating your thighs.
- Another method of training this action is to place a belt snugly around your thighs and attempt to pull your legs apart.
Step-5
Squeeze your knees together to engage your adductor group, stabilizing your legs in the air. The most posterior of this group is your adductor magnus. This muscle also synergizes your gluteus maximus in extending your femurs.
Step-6
Evert your ankles by contracting your peroneus longus and brevis muscles. Then balance this action by slightly inverting your ankles using your tibialis posterior. This combination of opposing forces creates a bandha that stabilizes your feet.
Activate your tibialis anterior muscles to draw the tops of the feet toward your shins. Extend your toes. Then try flexing and adducting your big toes to deepen the foot arches. This engages your flexors hallucis longus and brevis and adductor hallucis. You can gain awareness of these muscles before going into the posture by pressing the fleshy part of your big toe into the floor and attempting to drag it toward your second toe. Feel how these combined actions dynamize your longitudinal arches of the feet. Your tibialis posterior also contributes to this (in addition to inverting and stabilizing your ankles).
Contraindications
In Salamba Sarvangasana (Shoulder Stand Pose), the entire body is lifted up and balanced in the air with the help of shoulders, elbows and proper breathing. In view of the reverse state of the body, it is important to understand the effect of this yoga posture on the body. If the disease is not severe, most contraindications can be worked out with an experienced yoga teacher or yoga practitioner.
Although Salamba Sarvangasana (Shoulder Stand Pose) has many benefits, there are some contraindications should be kept in mind while practiced, as listed below:
1. Back pain
If someone is suffering from severe back pain or spinal cord injury, avoid this posture.
2. Spondylitis
Avoid this posture if someone has spondylitis and/or is undergoing treatment. But if spondylitis is mild, then this yoga pose can actually help in curing the disease under the guidance of an experienced yoga practitioner.
3. Heart problems
Individuals with heart problems, elderly, low flexibility or body control want to avoid this yoga pose or seek guidance from a yoga teacher/instructor.
4. Internal organs
If individuals has weak internal organs like spleen, liver or kidneys or enlarged thyroid, then this yoga pose should be avoided.
5. High blood pressure or migraine
Individuals with high blood pressure or migraine should avoid practicing Salamba Sarvangasana (Shoulder Stand Pose).
6. Pregnant or menstrual
Women who are pregnant and women during menstruation should avoid the practice of this yoga pose.
7. Throat or ear infection
If individual is suffering from a throat infection or ear infection, avoid this yoga pose as the flow of blood can cause discomfort in the muscles around the infected area.


