Restorative Yoga Poses to Support your well-being during, menstruation and Ignite.
Our bodies are not a similar, what works for us on one day might not be what resonates with us on the next. The same goes for your yoga practice and that is completely fine. Notably during menstruation, you may feel drawn to a gentler practice than usual, incorporating more rest and relaxation to support your body, mind, and spirit. Longer holds, and deep breathing make it extra juicy!
In general, you can hold these poses for a long time – 5 minutes (at least) or so – it is also a good idea to have a timer available. Even the timer on your phone’s clock will work if you set it to a gentle tone that won’t bother you when time arises. If you want to keep a posture for a long time, you can do so, as long as it feels comfortable. Some people hold these restorative poses for 20 minutes or longer.
When you are practicing alone, it can be easy for your brain to know how much time you have spent. Knowing that something is tracking time for you, these thoughts can be pushed aside, and you can fall deeply into a state of soothing meditation.
What is Restorative Yoga?
This yoga is a time to relax and stretch, which can relax your mind and body. While you can enjoy a slow restorative yoga class, it is also very easy to do at home. You will find that some simple poses give great relief from any stress in your day and can calm your mind while stretching your body. 1
Restorative yoga is a passive, meditative form of yoga that allows you to focus on your breath while releasing tension in your body. Restorative yoga often uses props such as folded blankets, blocks, or bolsters. These props help support your body and allow you to deepen the posture and relax your body completely.
The good thing about doing yoga at home is that you can use any of these poses alone or in combination whenever you want. After a long day, some things are resting themselves in the form of a deep, long stretch and a time that relaxes the mind. If you want to get an experience for this style of yoga, skip a class. This will help tremendously in your home practice.
Step by Step 12 Restorative Yoga Poses
Try these wonderful restorative yoga poses during your flow or incorporate these into individual poses in your practice if you feel called to slow down.
- Restorative child’s Pose
- Restorative tortoise pose
- Supported heart-opener pose
- Knees to chest pose (Bend the knees)
- Single knee to chest with extension
- Fish pose
- Happy baby pose
- Supine pigeon pose
- Supine twist pose
- Legs up the wall restorative yoga pose
- Reclining Bound Angle Restorative Yoga Pose
- Restorative Savasana
This yoga is gentle and is generally considered safe for most people. If you are concerned about the safety of Restorative Yoga, talk to your doctor or physical therapist before practicing this type of yoga.
1. Restorative child’s Pose
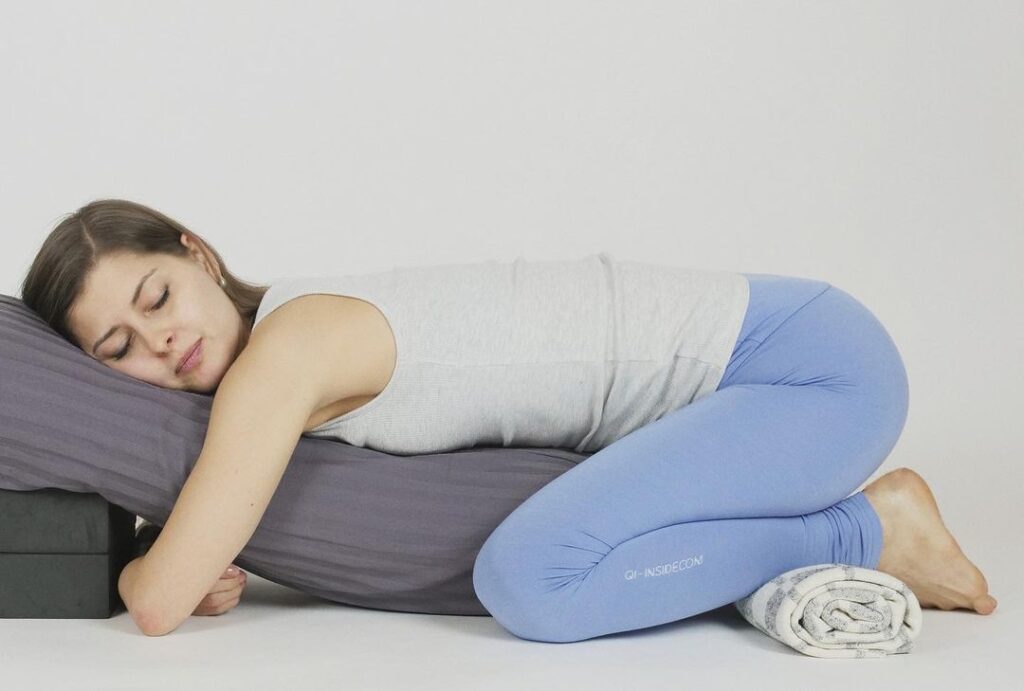
This Restorative child’s posture (balasana), is the yoga equivalent of a big hug, helps relieve stress and fatigue, and also gently stretches your spine, hips, glutes, hamstrings, and shoulder muscles. Here a long hold for 10 minutes or more, gives time to release your hips at a much deeper level.
How to do:
- Place a single block at the desired height under the far end of the bolster, then, add a folded blanket or two at the other end of the bolster on the floor.
- Kneel on the blankets, begin sinking hips back towards the heels and allow your chest to rest on the bolster.
- You can turn your heads to the left or right, or, use an eye pillow or rolled up blanket under the forehead to keep the head forward in a neutral position.
Options:
When caring for the knees, straighten your legs out to a seated straddle instead. The essence of the “Restorative child’s Pose” is in the forward fold with the head above the heart.
Creative visualization and breathing:
Seeing ourselves embraced by a golden light, bathing over your bodies, stripping away residual and stirring up the stagnant energy. As you allow this light to feed your transcendent energy, you are nurtured in this peaceful place of rest.
Breathing down into your hips, up to your mid-back and ribs, then across your shoulders and behind the heart.
2. Restorative tortoise pose
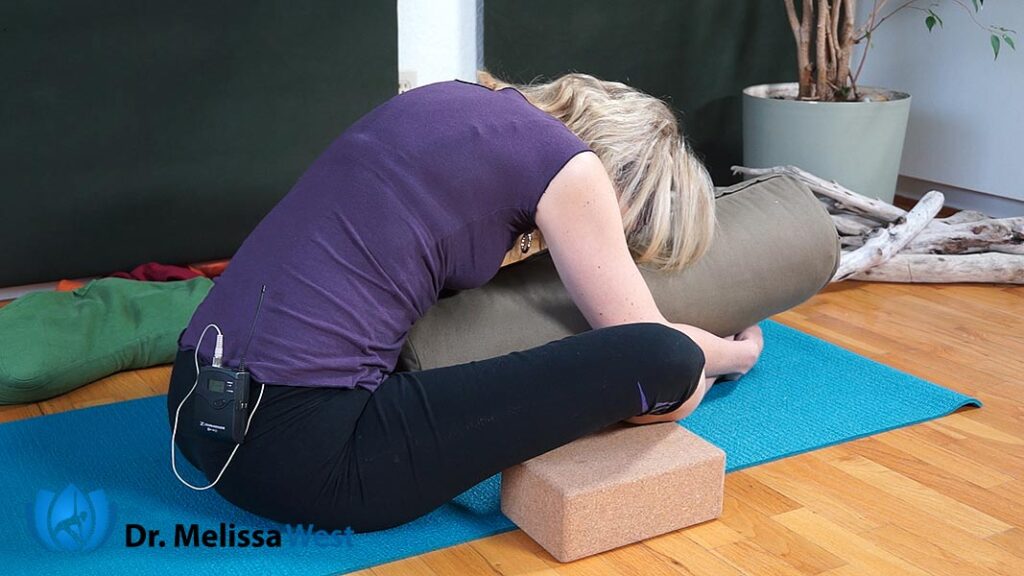
Restorative tortoise pose, similar to its tortoise Pose, this is one of the deepest forward folds of the primary series.
Like a tortoise pose withdrawing into his shell, this pose also allows the mind and senses to turn inward and its main benefits is that, it increases in blood flow to the heart and lungs.
Additionally, it improves the functioning of the digestive and respiratory systems. It’s rejuvenates the body and helps you get introspective so that you have the time and space to sort out some of your inner turmoil.
It’s soothing to your nervous system, and hopefully you will feel grounded and safe, if it untangles leads to emotional expression. And, since it’s a restorative yoga pose is going to relax a lot faster than an unsupported one, don’t be too surprised if you end up a few inches deeper in it than when you started.
How to do:
Grab a whole-bunch of props and a block under your knees, and a bolster, or pillow, or blanket stack for support your head and torso. You may need a blanket to sit-on, or an extra block for resting on your feet, but below your other props.
- Sit in a butterfly pose on the edge of a blanket, if you have difficulty forward folding. Pile props up on your feet until you have a tower that reaches your forehead or cheek comfortably.
- Bring a block or book under your knees. Lean forward and rest your forehead, or cheek on your tower. Set your timer for 5 minutes (at least) or more and close your eyes.
- If you rest on your cheek, remember to switch sides halfway through. Focus on your breathing and observing techniques and continue to allow your body to sink into the props.
- Come up with slowly when you hear the timer. Sit, breath, continue to observe.
3. Restorative or Supported heart-opener pose
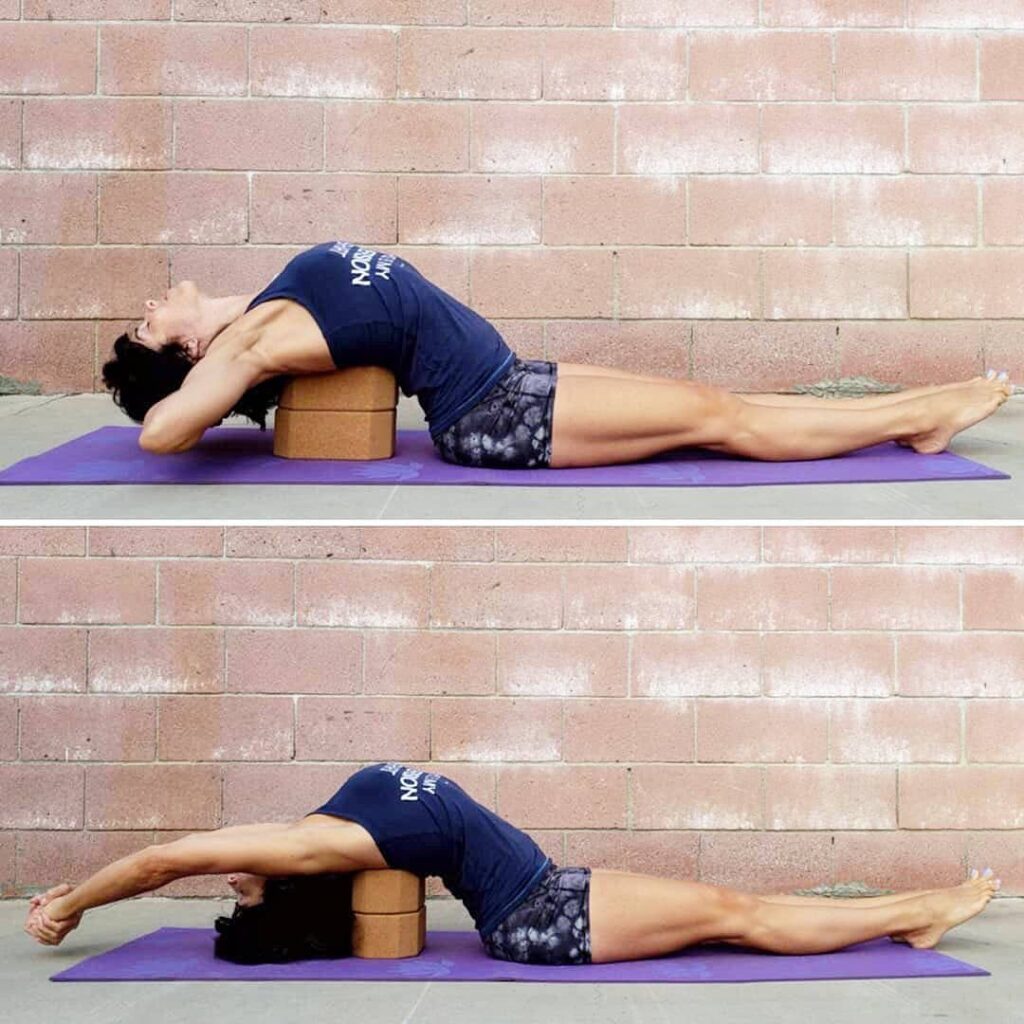
The restorative heart-opener pose is a supported pose meant to stretch your chest muscles and relaxing your neck and shoulder muscles.
Restorative heart opener yoga pose is done with a block, but a bolster or an ergonomic block can make it much more comfortable, so you can hold it for longer. The corners of a regular block start to dig into your back pretty quickly, making this yoga pose feel more like torture and less like bliss.
How to do:
- Start in a comfortable seated position with a yoga bolster, pillow, or rolled up blanket behind your back, make sure to keep your bottom on the floor (off the supportive prop).
- Bring both your feet to the floor and bend your knees. Slowly lie back onto the yoga bolster or pillow support, allow the support to run along the length of your spine.
- Bring the hands to your stomach, or on the floor beside your body with palms facing up.
Advance:
Bring your arms out to the side and bending your elbows or above your head to rest on the floor.
You can keep the knees bent and feet on the floor, or if it feels okay in your lower back, bring the feet out in front of you and reach your legs out long.
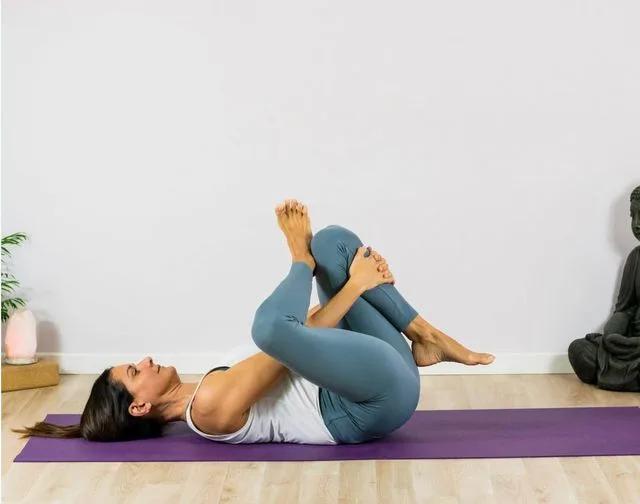
4. Restorative knees to chest pose

A classic yoga posture, Restorative knees to chest pose has many therapeutic benefits. This Restorative yoga pose flows downward and out of your body, eliminating impurities through the lungs and excretory systems.
It, a great digestive health pose, helps to relief from excess digestive air, indigestion, bloating, flatulence, acidity, and constipation. In addition, restorative knees to chest pose, helps to keep your low back limber and often recommended for those suffering from irritable bowel syndrome.
How to do:
- To start, lie on your back with your legs and arms extended.
- As you exhale, draw your both knees to the chest and clasp with your hands around them.
- Keep your back flat on the floor. Release your shoulder blades down toward the waist and broaden across your collar bones.
- Draw your tailbone and sacrum down toward the floor, you may lengthen your spine even more.
- Do softly rock backward and forward, or side-to-side, to massage your spinal, If it is comfortable for you.
- Tuck your chin slightly and gaze down the center line of the body.
- Hold here for up to 60 seconds and keep your breath smooth and even.
- To release from this pose, exhale and extend both legs along the floor and rest. Repeat this pose 5 more times.
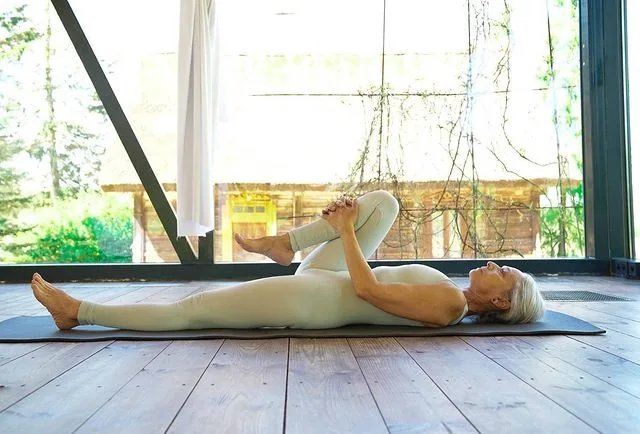
5. Single knee to chest with extension
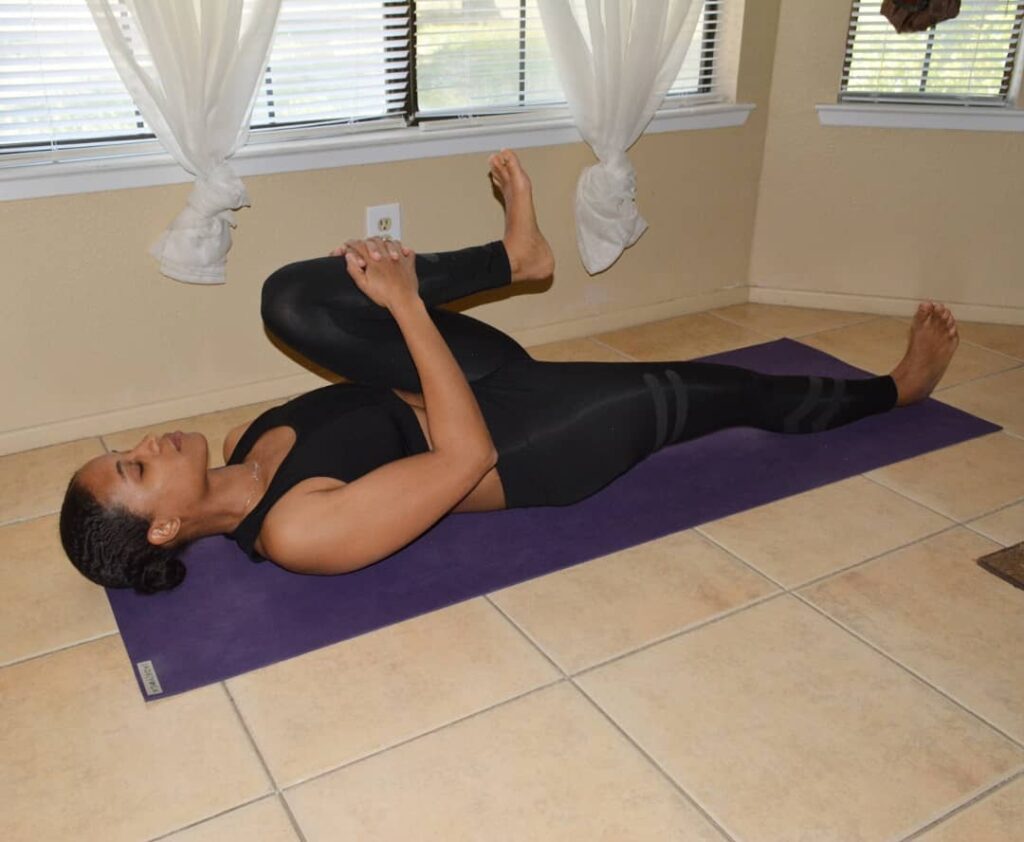
The Single knee to chest with extension is used to stretch your hip and low back (lumbar spine) muscles. It also helps relieve pressure on your spinal nerves, reduces pain and improve the stability of the lower pelvis.
How to do:
- To perform, lie on your back with your knees bent and your feet flat on the floor.
- Grasp your right knee with your both hands and bring towards the chest then hug it. Leave your left foot on the floor and press your lower back into the floor.
- Remain in this position for 15-20 seconds and release from this position and repeat this process with other leg.
6. Fish pose (Matsyasana)
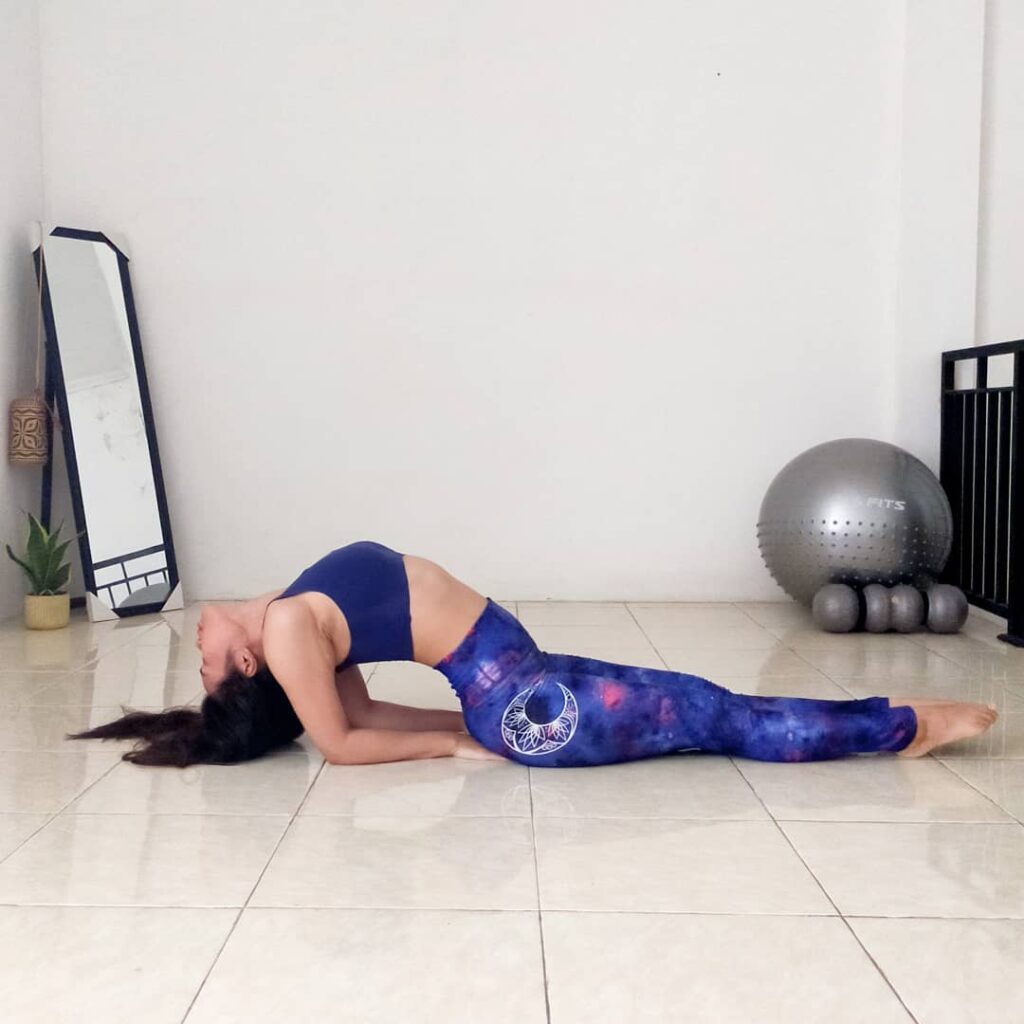
Fish Pose stretches the front of your body, including the chest, abs, hip flexors, neck, back, and relieve tension in the neck and shoulders. It helps to relief from respiratory disorders by encouraging deep breathing, and it tones your parathyroid, pituitary and pineal glands.
In addition, it engages parts of your body that are often neglected, even within yoga poses.
How to do:
- To start, lie down on your back, bend the knees with the soles of your feet on the floor, arms alongside your body, palms down.
- Lift the hips and slide the hands underneath your upper buttocks.
- Inhale, and press into the elbows and shoulders, lifting your chest.
- Depending on the intensity of your backbend, bring either your back or your top of the head to the floor. However, there would be very little weight on it.
- If this feels stable, extend the legs out one at a time. Extend through your heels, with a slight inner rotation of your upper legs.
- Remain in this position for 5 breaths, breathing towards the chest and rib cage.
- To release from this pose, press your elbows down to lift your head and gently place your spine down on the floor.
7. Happy baby pose
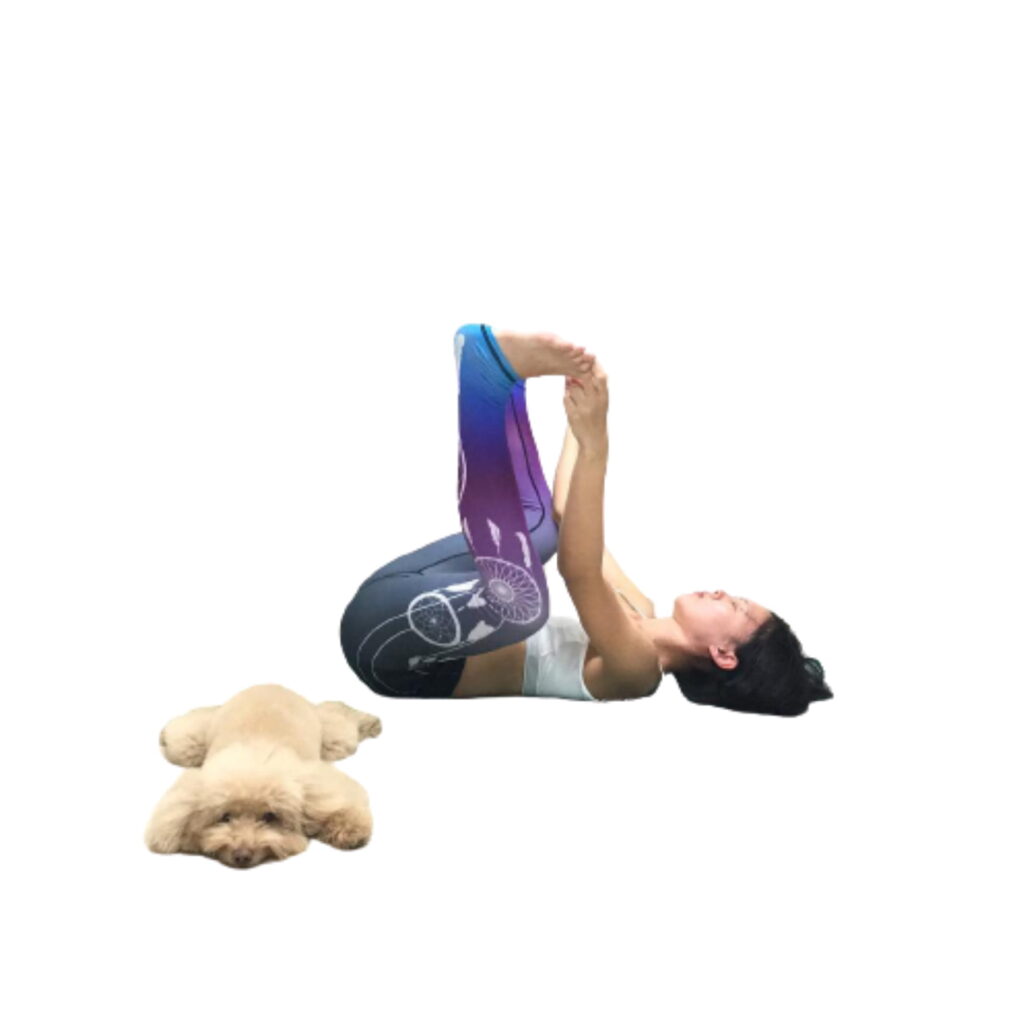
The Happy Baby Pose is a gentle and soothing pose that’s great for increasing relaxation and stretching the body. This yoga pose opens your hips and give a stretch to your inner thighs, hamstrings at the back of the thighs, and groin. Happy Baby Pose releases your back and sacrum. It is a relatively easy movement, so it’s ideal for beginner yogis as well.
How to do:
- Start laying on your back and find a neutral spine position where the natural curves of the spine are present but not exaggerated.
- Bring the knees toward your chest. As you bring the knees-up, keep the hip sockets soft so that the legs come up, but your hips will stay down. Keep your neutral spine with your tailbone on the floor.
- Flex the feet and show the soles of your feet to the ceiling.
- Wrap the first two fingers around your big toes and pull lightly down. Your feet stay flat to the ceiling, but your hips release allowing the knees to return closer to the chest as you relax. You may also bring the hands up to the outside of your foot and grasp your foot around the arch. Use a strap if you needed.
- Stay in this position and breathe deeply.
- To release yourself from this pose, let your back relax into the floor—don’t push it down, just allow it to release naturally.
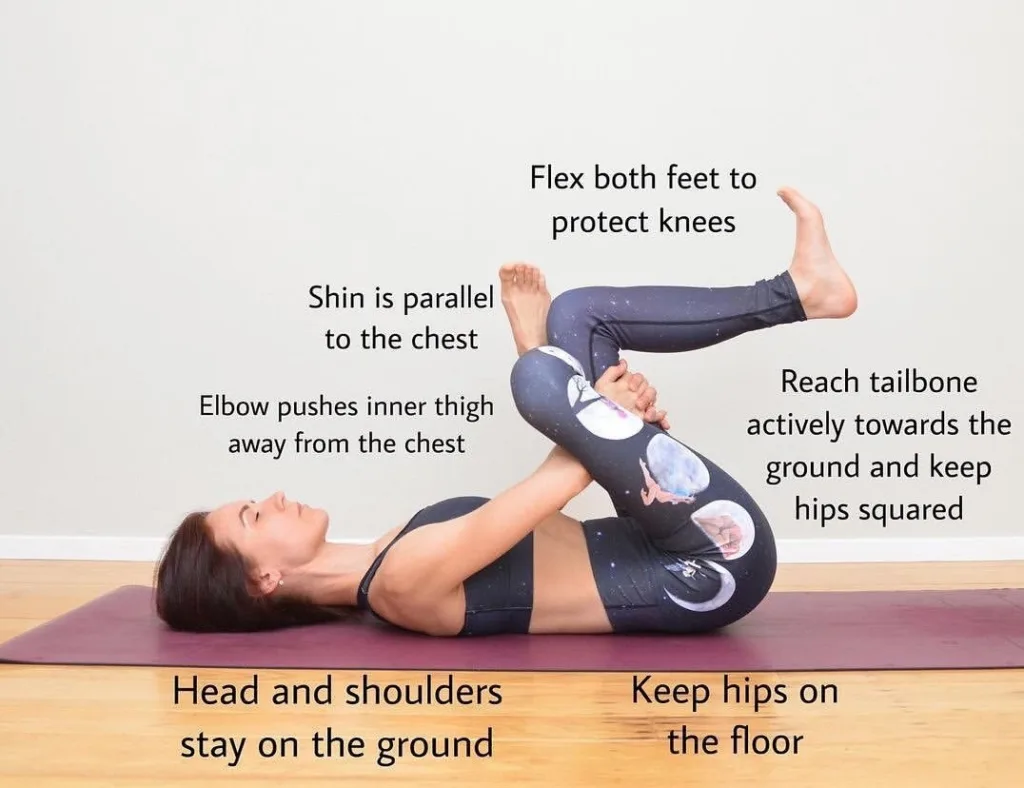
8. Supine pigeon pose
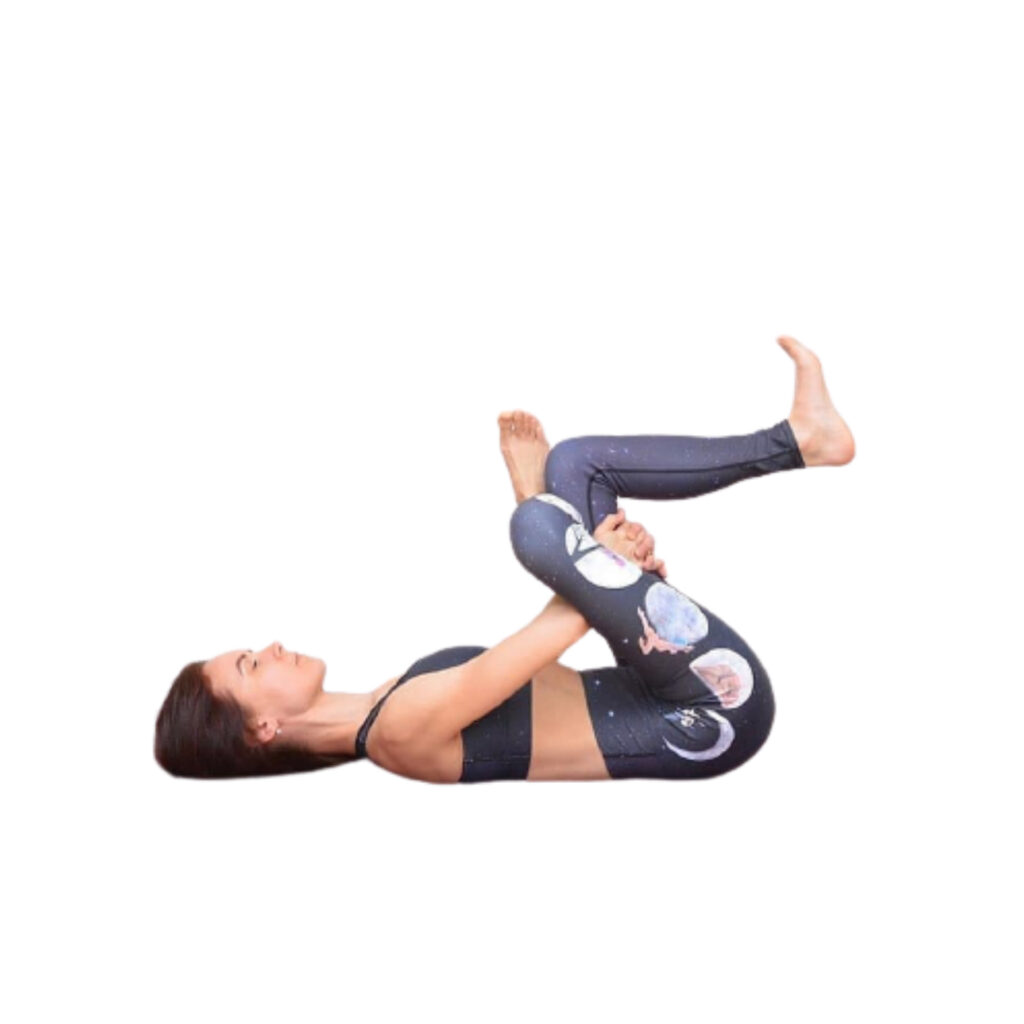
The Supine pigeon pose is very beneficial to your body. In Yin Yoga, it balances your liver and gall bladder meridians. It releases tension in your hips, soothes sciatica, releases anger/frustration and brings a sense of ease to your body. Apart from this, in general, regular practice of Supine pigeon pose releases the tension in the muscles of your lower back, hips and hamstrings.
How to do:
- Star by lying on your back, bend your knees to bring your feet to the floor. Cross your right ankle over the left thigh just above your knee.
- Lift your left foot off the ground and bring your left knee towards your chest. Clasp your hands behind your left thigh and use your right elbow to gently press your right knee away from your body.
- Find the length in your back of the neck and breathe into any areas of tension.
- Breathe into your hips and let the breath guide the release of those large muscle groups.
- Repeat this process on the opposite side.
9. Supine twist pose
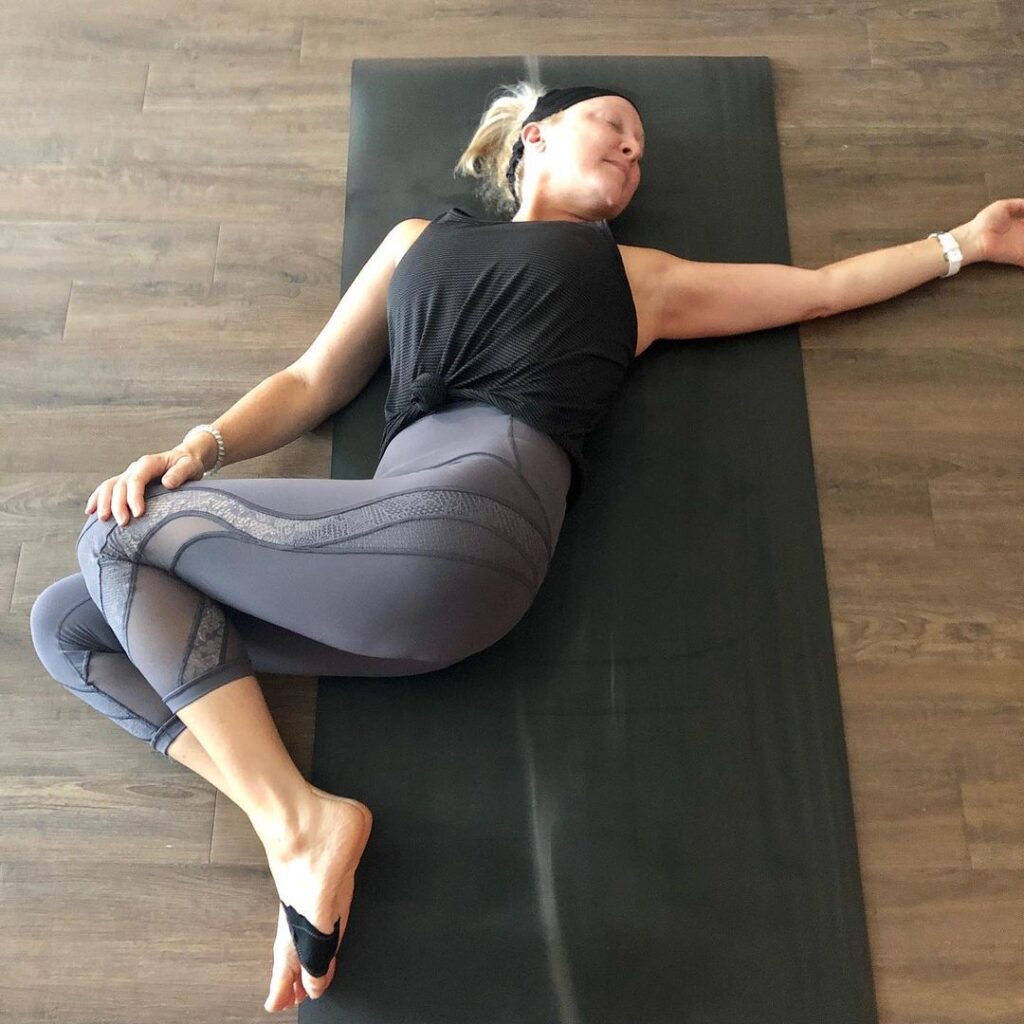
A Supine twist pose is a common way to transition into savasana, encourages the movement as well as the mobility in your spine. In general, twist poses are the best for increasing flexibility in your spine. It can be very helpful in alleviating stiffness in your lower back and hips; toning your abdomen and improve your digestive system as well.
How to do:
- Begin by lying down with hold your knees.
- As you exhale, with the use of your left-hand drop-down your knees to your left side.
- After that stretch the arm to rightward and bringing the gaze to the opposite direction with turning your head.
- Remain in this position for 5-10 breaths or longer.
- Now come to your relaxed position and repeat this process with the other side.
10. Legs up the wall restorative yoga pose
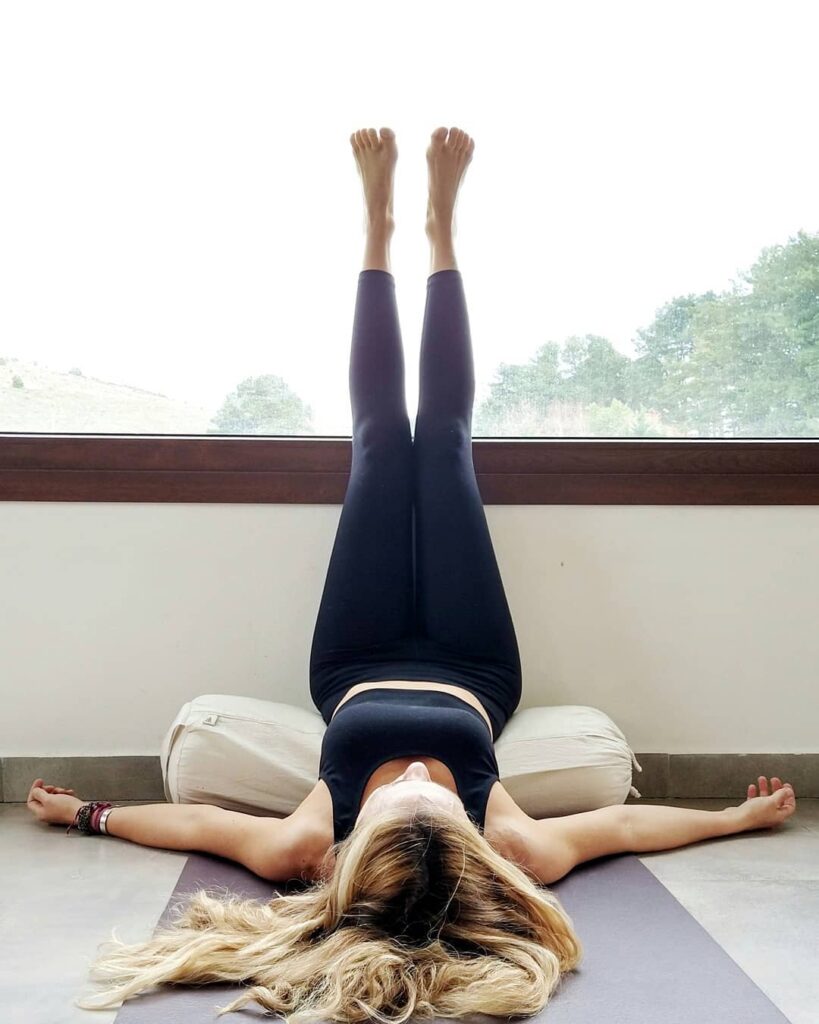
The legs up the wall restorative yoga pose, a passive yoga posture, allows your mind and body to relax, relieving stress and tension.
It is one of the most approachable poses, as the restorative yoga pose doesn’t require much strength or flexibility. Legs up the wall restorative yoga pose is also an excellent, calming pose for the morning or bedtime meditations.
How to do:
- Begin by setting up a cozy space around a wall.
- Next, move the hips as close to the wall as possible, then start moving your feet up the wall until your body is in some L-shaped position.
- Do not try to bring your body to a full 90-degree angle as this can impede circulation at your hips. Instead, slide the hips a few inches off the wall and/or raise the hips up by placing a cushion under your sacrum.
- You may make any adjustments to facilitate a more relaxing space – may be place a pillow under your head, or may be let your arms rest on your belly or out to the sides.
- At this point, focus on your breath – try elongating your breath, taking a deep, slow inhale through the nose and a deep, slow exhale through the nose.
- Remain in this posture for at least 5 minutes or more for optimal benefits.
11. Reclining Bound Angle Restorative Yoga Pose
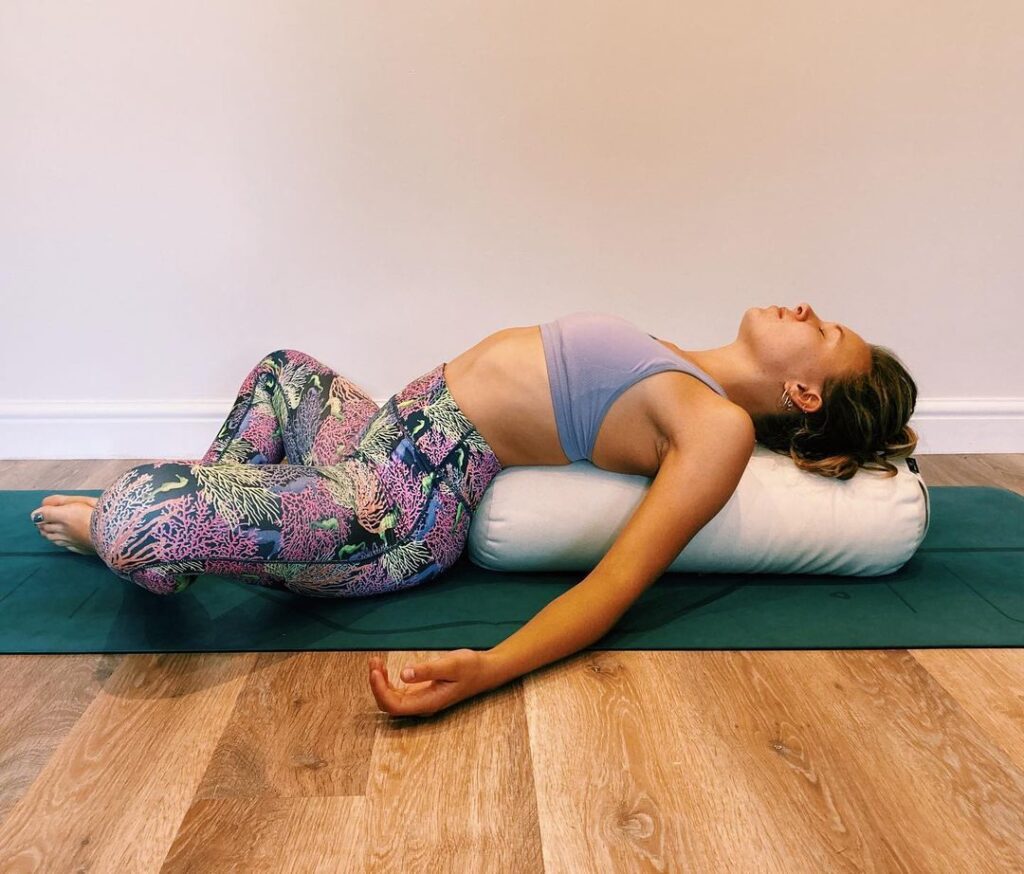
The Restorative Reclining Bound Angle Pose is similar to the Supported Reclining Pose, the only difference here is that instead of keeping your legs straight on the floor, you bend the knees and touch the soles of the feet together. This Restorative yoga pose, helps to gentle stretching of the inner thighs, groin, and lower belly.
Restorative Reclining Bound Angle Pose, just like the Supported Reclining Pose, allows your shoulders to “rest back” into their natural position rather than stay rounded forward all day in computer and/or desk work. For women, this particular Restorative yoga pose, especially beneficial on the first few days of your cycle, as the open position helps your uterine muscles to relax for unobstructed flow.
How to do:
- Start by lie straight and flat on the floor. Then, gently bend the knees and bring your feet together with the outer edges of both your feet on the floor. Place your heels close to the groin.
- Your palms must lie next to the hips and pressed downwards.
- Exhale, and ensure that your abdominal muscles contract as the tailbone moves close to the pubic bone. Feel the elongation in the lower back and the stability in the spine as your pelvis tilts. Hold this position.
- Inhale quickly, and as you exhale again, let the knees open up such that it creates a good stretch in the groin and inner thighs.
- You must ensure that the lower spine is not forcefully arched. Also, ensure that the shoulders are relaxed and placed away from the neck.
- Remain in this posture for up to 60 seconds or more, breathing deeply and slowly.
- Exhale, and release from this posture. But before you do so, press the lower back and knees to the floor to give that final stretch. Then, hug the knees, and rock from side-to-side before you release.
12. Restorative Savasana
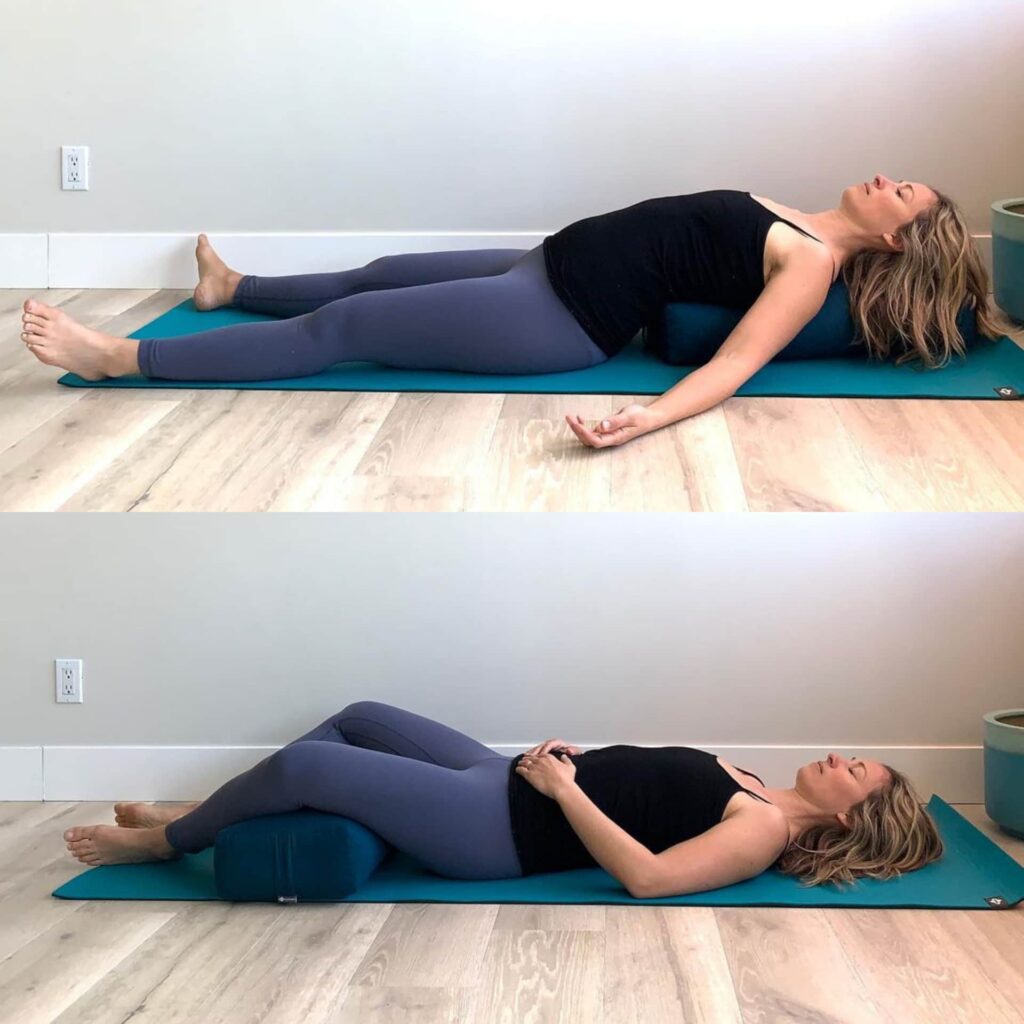
Restorative Savasana can be a very expansive yoga pose, especially it’s done by your legs wide apart and your arms away from your side body. By keeping your legs and arms a little closer to your body it encourages a more contained feeling.
How to do:
- Start by setting up in Savasana by laying down with a bolster under the knees, a rolled blanket under the ankles, and a rolled blanket to support the curvature of your neck.
- Supporting your neck is the key here to really tap into the parasympathetic response.
- Get the most benefits of this pose, by adding the weight and support of a sandbag or pillow on top of the belly.
- Rest in this Restorative Savasana 5 to 15 minutes or more. Perceive your body fully supported and landing onto the earth and give your body permission to relax and be at happiness.
What do you do before practicing these 12 restorative yoga practice?
Restorative yoga is a practice that nourishes the body from inside to outside. It is a practice of non-judgment. It is a practice of curiosity and tuning into the internal state of your body.
Healthy yoga taps into our body’s natural ability to heal and maintain a healthy state of balance. I hope this practice helps you relax, support, rejuvenate and restore.
Rest is the best, especially when you are feeling tired, stressed and overwhelmed. This practice can be of benefit.
Before you start your this practice, take a few moments on the ground and find a comfortable sitting position so that you can feel the weight of your sitting bones.
Then, take a moment to welcoming the breath into your body and begin to observe the breath in its natural state.
Take three vocal exhalations through your mouth for three faces. If possible, try to sit for a few moments watching your breath and sensations within your body without the need to change, explain or move anything. In exhale.
- Corey SM, Epel E, Schembri M, et al. Effect of restorative yoga vs. stretching on diurnal cortisol dynamics and psychosocial outcomes in individuals with the metabolic syndrome: The PRYSMS randomized controlled trial. Psychoneuroendocrinology. 2014;49:260-271. doi:10.1016/j.psyneuen.2014.07.012[↩]


