Downward Facing Dog (Adho Mukha Svanasana) practice will warm, strengthen and stretch the entire body. You can use it as a transitional pose (among other poses), or as a full-body stretch on your own.
Try a few rounds of downward facing dog during your day to increase blood flow and energy while calming your mind! You can get benefits from all areas of your life, even from the mat.
Information
| Known as: | Downward Facing Dog, Adho Mukha Svanasana, Downward Dog Pose, Down dog |
| Sanskrit Name: | अधोमुख श्वानासन |
| IAST: | Adho Mukha Śvānāsana |
| Pronunciation: | Ahd-hoh Moo-kah Svah-nuh-suh-nuh |
| Type: | Stretch, strength, forward bend |
| Level: | Intermediate |
| Drishti: | At the floor; Between your feet |
| Total time: | 30-60 seconds; up to 1-2 minutes or more |
| Chakra: | Root Chakra (Muladhara Chakra), Third Eye Chakra (Ajna Chakra) |
| Indications: | Legs, arches of the foot, calf, hamstring, shoulder, arm, flexibility, digestive system, abdominal organs, stress, anxiety, relaxation, back pain, sciatica, headaches |
| Focus: | Entire body |
| Counterposes: | Child’s Pose (Balasana), Upward Facing Dog (Urdhva Mukha Svanasana), Forward Fold (Uttanasana), Cobra Pose (Bhujangasana), Mountain Pose (Tadasana) |
| Preparatory poses: | Cat-Cow Pose (Marjaryasana-Bitilasana), Puppy Pose (Anahatasana), Plank Pose (Phalakasana), Forward Fold (Uttanasana), Standing Half Forward Bend (Ardha Uttanasana) |
| Follow-up poses: | Standing Forward Fold (Uttanasana), Warrior I (Virabhadrasana I), Triangle Pose (Trikonasana), Cobra Pose (Bhujangasana), Child’s Pose (Balasana) |
| Contraindications: | Wrist injuries, shoulder injuries, high blood pressure, pregnancy |
Meaning
The name “Adho Mukha Svanasana” is derived from the Sanskrit words – Adho + Mukha + Svana + Asana:
- “Adho” = “downward”
- “Mukha” = “facing”
- “Svana” = “dog”
- “Asana” = “pose” or “posture”
So, the literal translation of Adho Mukha Svanasana is “Downward Facing Dog Pose”. The pose looks like a dog when he leans forward.
In yoga philosophy, dogs are considered to be loyal and faithful animals, and this pose is believed to embody those qualities. Practicing Adho Mukha Svanasana is said to cultivate strength, stability, and devotion, while also helping to release tension and stress from the body and mind.
In addition, this pose is said to activate the Muladhara (root) chakra, which is located at the base of the spine and is associated with grounding, stability, and a sense of security. By activating this chakra, Adho Mukha Svanasana is believed to help us connect with our physical body and the earth, and to promote a sense of stability and security in our lives.
There are many amazing benefits of this asana that make you extremely important to practice it every day. The best part is, even a beginner yogi can do easily this pose.
Benefits of Downward Dog (Adho Mukha Svanasana)
It stretches the hamstrings and calves and strengthens the arms, legs, and back. It can help relieve back pain. As a mild reversal, it acts opposite to the normal forces on your spine and brings more blood flow to your brain. The pose also strengthens the deep abdominal muscles, which helps to stabilize the spine.
Physical Benefits
- Improves digestion
- Relieves insomnia, menstrual and menopausal discomfort, and low back pain
- Strengthens the arms, legs, and torso
- Stretches the palms, chest, back, hamstrings, calves, and feet
- Energizes the body
Mental Benefits
- Improves focus
- Develops willpower
- Stimulates the mind
- Relieves stress and mild anxiety
Downward Facing Dog (Adho Mukha Svanasana) is known for relaxing muscles. Attempting to stretch your hands while performing this pose increases tension in the tendons of the muscles, and in response to stress, the spinal cord signals the muscles to relax. Stretching through poses releases endorphins that help to relax your body and mind.
Step-by-step Instructions of Downward Facing Dog (Adho Mukha Svanasana)
Step 1
Come to all fours, placing your hands directly under your shoulders. Spread your fingers evenly and root down into the floor through all four corners of your hands. Rooting down means to extend downward energetically like a tree sending down roots into the earth. Inhale and draw muscu-larly from your hands up into your shoulders. Keep-ing your arms steadfast and straight, exhale and draw your shoulder blades onto your back.
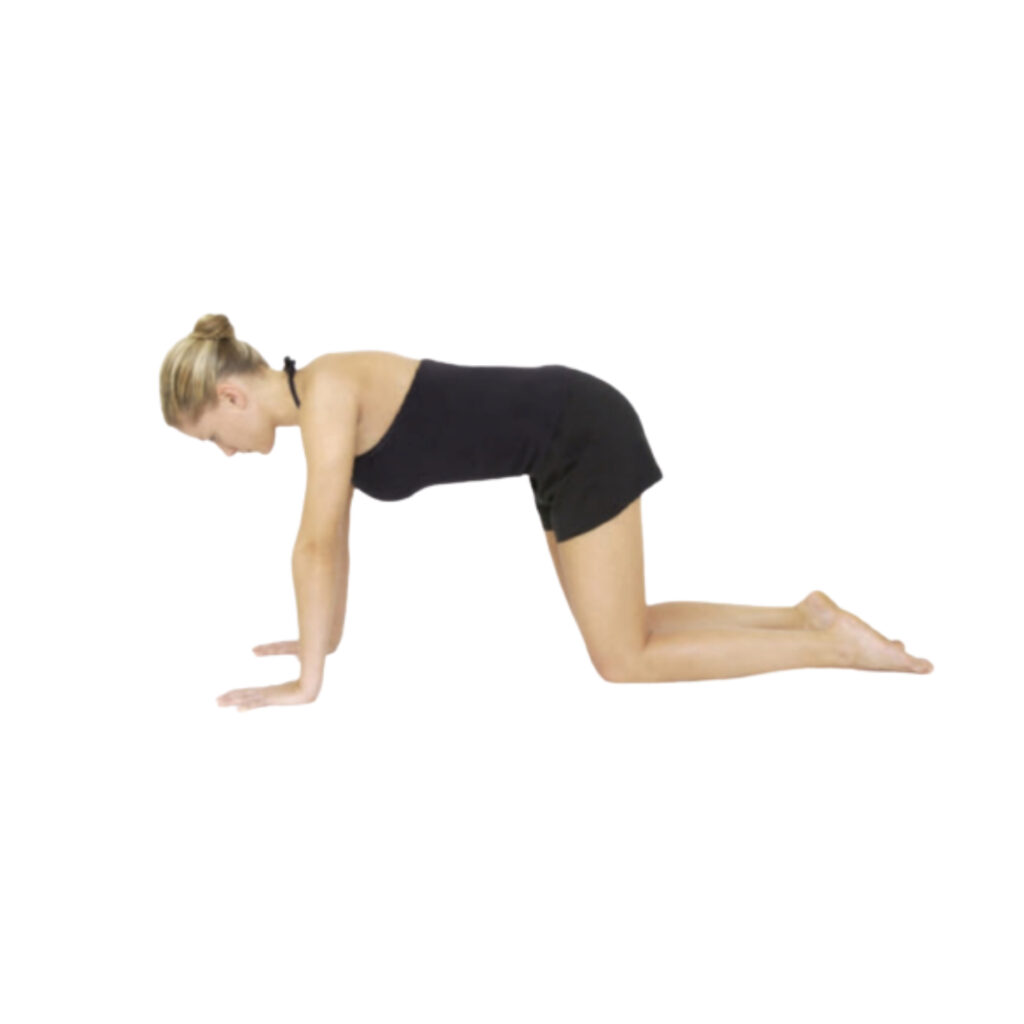
Tip:
- Wrist. Line up the creases of your wrists so they are parallel with the front of your mat (or if not using a mat, with where your mat would be).
- Elbow. Keep the inside creases of your elbows facing each other.
- Hip. Walk your knees back slightly behind your hips.
Step 2
Maintaining the action of step 1, inhale, lift your hips, and lengthen back through your spine and hips.
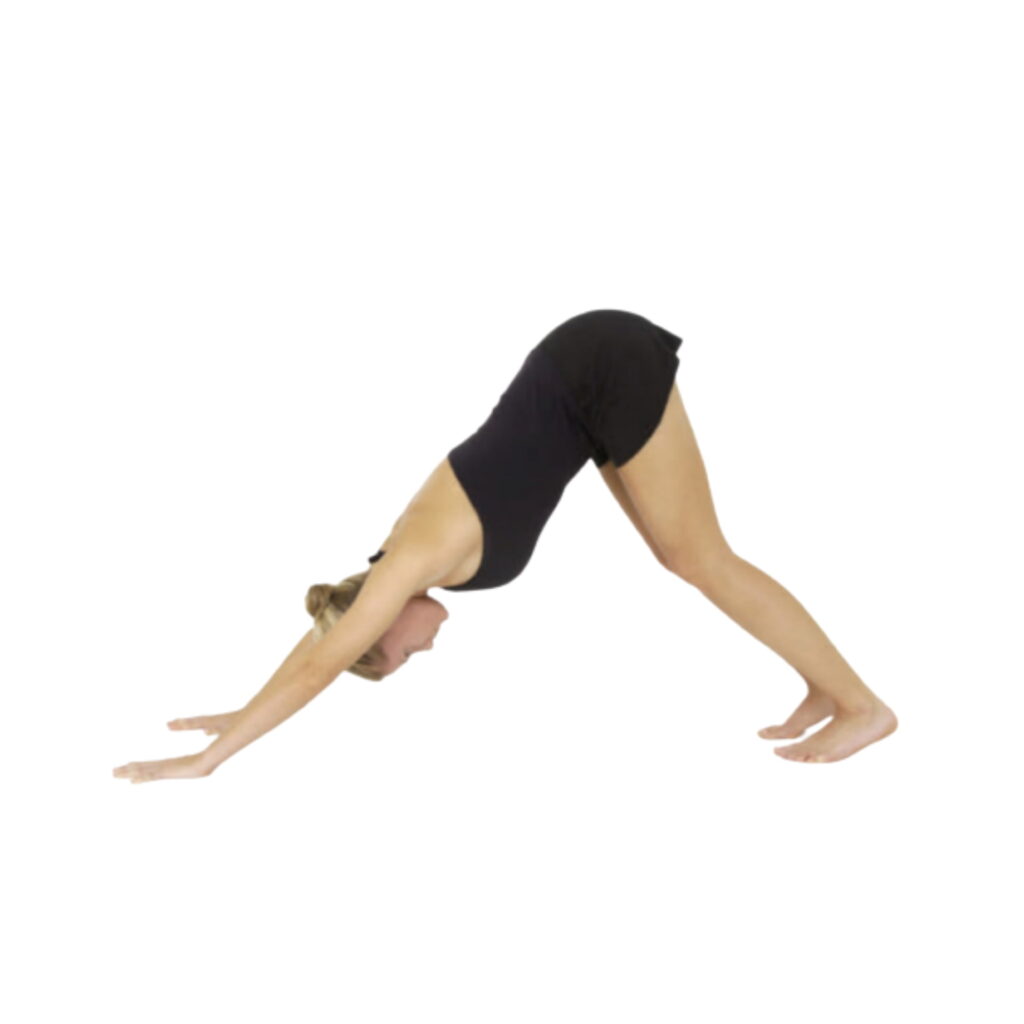
Tip:
- Wrist. Root down firmly into the floor through your hands.
- Elbow. Keep your arms straight by anchoring your hands down and drawing the muscles up your arms from your wrists into your shoulders.
- Knee. Separate your knees as wide apart as your ankles.
Step 3
Straighten your legs to come into the full pose.
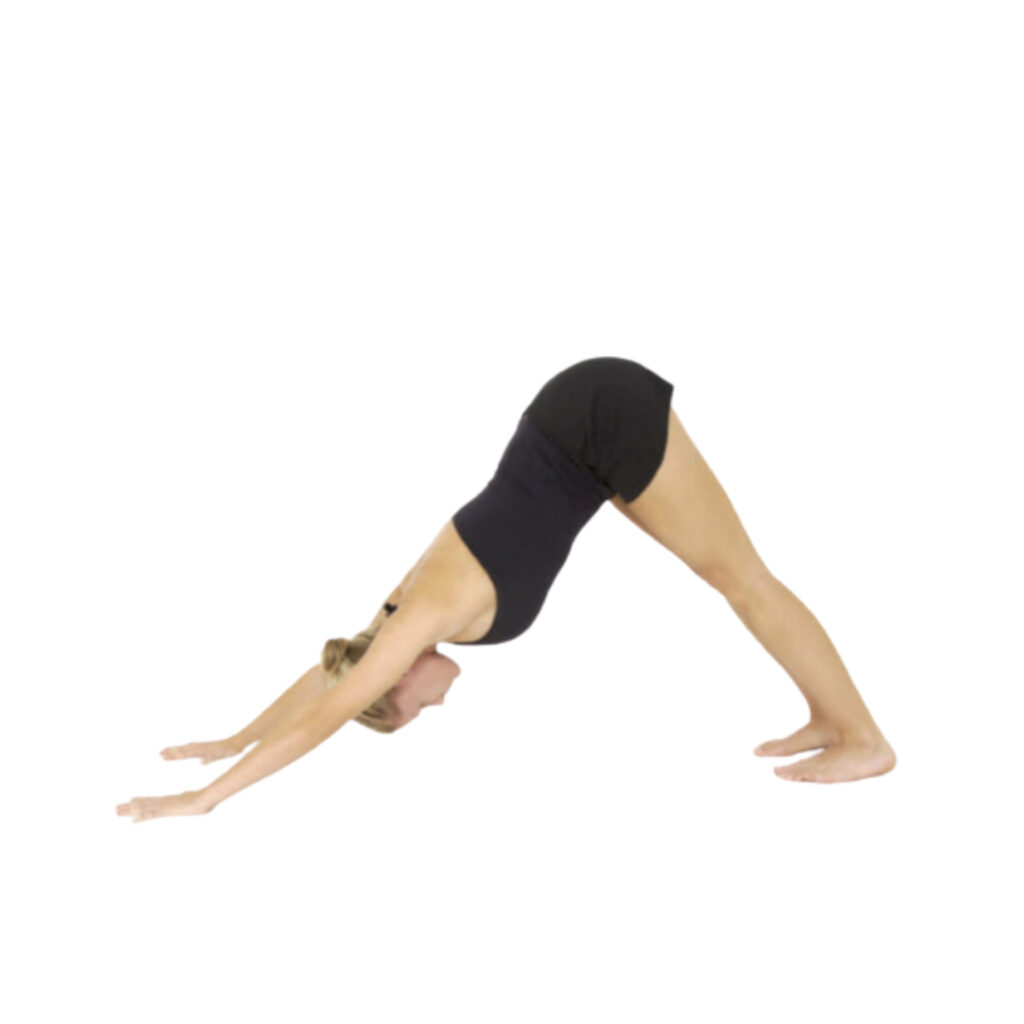
Tip:
- Lengthen from your heart down through your arms and up to your tailbone.
- Press your thigh-bones back into your hamstrings.
- Keeping the toes spreading, root from your tailbone down through your legs to bring your heels toward the floor.
Step 4
Hold for a few breaths. Release and lower yourself into Child’s Pose.
Precautions and contraindications
While Downward Facing Dog (Adho Mukha Svanasana) is generally a safe and accessible pose for most people, there are some precautions and contraindications to be aware of. It is best to consult a professional trainer or medical practitioner before performing this asana.
- Wrist injuries: This pose places weight on the hands and wrists, which can exacerbate existing wrist injuries or cause new ones. To avoid wrist pain, it’s important to distribute the weight evenly across the hands and fingers, and to avoid collapsing into the wrists. Additionally, if you have a wrist injury or condition such as carpal tunnel syndrome, it may be necessary to modify the pose or avoid it altogether.
- Shoulder injuries: Downward Facing Dog can place stress on the shoulders, particularly if the shoulders are tight or injured. To prevent strain or injury to the shoulders, it’s important to engage the shoulder blades and draw them down the back, while also keeping the arms strong and engaged. If you have a shoulder injury or condition, such as a rotator cuff tear, it may be necessary to modify the pose or avoid it altogether.
- High blood pressure: This pose involves an inversion of the head, which can increase blood pressure in some people. If you have high blood pressure, it’s important to monitor your blood pressure during the pose, and to avoid holding the pose for extended periods of time.
- Pregnancy: Downward Facing Dog can be a safe and beneficial pose for pregnant women, but it’s important to modify the pose as needed to accommodate the changing body. For example, placing blocks under the hands can help to alleviate pressure on the wrists and support the upper body. Additionally, pregnant women should avoid compressing the belly or lying on their backs for extended periods of time.
Overall, it’s important to practice Downward Facing Dog with awareness and caution, and to listen to your body’s needs and limitations.
Modification and alteration of Downward Facing Dog
Since this asana is performed so frequently during Ashtanga, Vinayasa and Power Yoga classes, it is important to learn how to do it properly to avoid injury and fatigue.
Do these simple changes to find the variation that works best for you:
- To warm the hips and start stretching, bend one knee while keeping the other leg straight. Change sides and repeat five times.
- To correctly know the spine-length aspect of the downward dog, first bend your knees to the balls of your feet and pose. Bring your calves parallel to the mat and raise your sitting bones up and back. Press your hips towards the wall behind you. Then, slowly start straightening your legs.
- For greater challenge, raise your right foot as high as possible, reaching the heel. While raising your right leg, extend your left hand behind you. Rest on your low back with the back of your hand. Repeat on the other side.
- For the restorative version of the pose, place a yoga block under your head. Release all neck tension. Hold for five minutes.
- Place a yoga block between your inner thighs to know the movement of internal rotation. Hold the block with your thighs and push it to the wall behind you as you hold the pose.
Preparatory poses before Adho Mukha Svanasana
There are several preparatory poses that can help to prepare the body for Downward Facing Dog Pose. These include:
- Cat-Cow Pose (Marjaryasana-Bitilasana): This is a gentle warm-up pose that can help to mobilize the spine and warm up the muscles in the back.
- Puppy Pose (Anahatasana): This is a gentle heart-opening pose that can help to stretch the chest and shoulders, preparing them for the weight-bearing demands of Downward Facing Dog.
- Plank Pose (Phalakasana): This is a pose that can help to strengthen the core and upper body, preparing them for the demands of Downward Facing Dog.
- Forward Fold (Uttanasana): This is a standing forward fold that can help to stretch the hamstrings and prepare them for the lengthening demands of Downward Facing Dog.
- Standing Half Forward Bend (Ardha Uttanasana): This is a pose that can help to prepare the spine and shoulders for the weight-bearing demands of Downward Facing Dog.
Incorporating these preparatory poses into your yoga practice before Down Dog Pose can help to warm up the muscles and joints, prevent injury, and enhance the benefits of the pose.
Follow-up poses after the Downward Facing Dog
After practicing Adho Mukha Svanasana, some good follow-up poses that can help to continue the benefits of the pose and further stretch and strengthen the body include:
- Standing Forward Fold (Uttanasana): This pose can help to deepen the stretch in the hamstrings and further lengthen the spine.
- Warrior I (Virabhadrasana I): This is a standing pose that can help to strengthen the legs and hips and stretch the chest and shoulders.
- Triangle Pose (Trikonasana): This is a pose that can help to stretch the hips, hamstrings, and spine, and strengthen the legs.
- Cobra Pose (Bhujangasana): This is a gentle backbend that can help to stretch the spine and chest.
- Child’s Pose (Balasana): This is a gentle forward fold that can help to release tension in the back and neck and promote relaxation.
Incorporating these follow-up poses into your practice can help to continue the benefits of Down Dog Pose and promote a more balanced and healthy body.
Bottom line
Downward Facing Dog is the poster pose for yoga. The reason it has become the most famous posture is that it is so important in contemporary practice.
You can learn this first pose with starting a yoga practice. This is mostly done several times during yoga classes, especially in Vinayasa Yoga. It acts as a transitional posture and can be a resting position. Downward Dog is one of the Surya namaskar (sun salutation) sequences.
It is easy to know if you are doing this asana correctly. If you feel that your joints are stressed, or you are unstable, then you need to check your alignment. Start, and make sure your knees are right under your hips, and your hands are under your shoulders. Also, make sure that the creases on your wrist and elbow align with your mat.
Initially, the shoulder release may be difficult to correct. To get this right you can practice against the wall. Stand with your feet approximately three feet away from the wall (hip distance). Make sure that you are facing the wall. Then, place your hands on the wall, and run them down until they reach the level of your torso. Your arms should be parallel to the floor.


