The deadlift is a compound exercise, which means you recruit multiple muscle groups to work together to perform the exercise properly.
More specifically, it is used to develop overall strength and size in the back series, you will build muscle in:
- Legs (specifically your glutes and hamstrings), quads, adductors, and calves
- Lats, lower back, middle back, and upper back
- Traps
- Abs
- Forearms
And the rest of your back chain also puts a huge strain on your central nervous system.
It is a competition lift in the sport of powerlifting, but it is also considered a classic benchmark of overall strength, you may refer to the deadlift as a leg day exercise or back-building move.
The two types of deadlift, conventional and sumo
- When performed with the hands outside the knees, are often referred to as the “conventional deadlift“.
- When the feet are wide and the hands are inside the knees, it is a “sumo deadlift.”
What is Deadlift?

Deadlift is the ultimate full-body workout, training just about every muscle group in your body: leg muscles, glutes, entire back, core and arm muscles. Basically, any muscle that is involved in producing whole body power is involved in the deadlift, and that is why it is an integral part of every serious strength training program.
While some argue its effectiveness for building muscle and strength, some claim it is one of the “dangerous” exercises we should avoid unless we want to one day have serious back problems.
Deadlift 101
At first glance, this fear is understandable: lifting hundreds of pounds off the ground—putting all that pressure on your back, especially your low back and erector spinae muscles—would be a recipe for thoracic and lumbar disaster. Isn’t it?
Well, let’s start by reviewing a study conducted by researchers at the University of Valencia that set out to determine the most effective way to train the para-spinal muscles, which run along both sides of your spine. And play a major role in prevention of back injuries. 1
Researchers had 25 people without back pain do two types of exercises for their backs:
- Bodyweight exercises such as lumbar extension, forward flexion, single-leg deadlift and bridge and
- Two weighted exercises, deadlifts and lunges, using 70 percent of your 1RM weight.
Muscle activity was measured using electromyography, a technique for measuring and analyzing muscle contractions through electrical activity occurring in muscles.
Results: Deadlifts activated the para-spinal muscles the most. And it wasn’t even close. The deadlift had an average electromyographic muscle activity of 88 percent and peaked at 113%, while the back extension produced an average activity of 58 percent and a peak of 55%, and the lunge produced an average of 46% and a peak of 61%. Rest exercises average between 29 and 42% muscle activity, with the supine bridge on a BOSU ball being the least effective.
Thus, the researchers concluded, the deadlift is an incredibly effective way to strengthen the para-spinal muscles.
Another study was conducted by researchers at the University of Waterloo to determine how much low-back flexion deadlifting causes and thus how much stress it places on the vertebrae and lumbar ligaments. 2
Did the exercise put the back, and especially the low back, under excessive stress that could lead to injury?
The researchers used real-time X-ray imaging (called fluoroscopy) to look at the spines of typical powerlifters while they fully flexed their spines without weights and when they lifted 400 pounds (ca. 181 kg). Deadlifted more than, except for one subject’s one trial, all men completed their deadlifts within the normal range of motion they displayed during full flexion. Ligament length was unaffected, indicating that they do not help support the load, but rather limit the range of motion.
So, as we can see, a proper deadlift effectively strengthens your entire back, including your erector spinae muscles, and doesn’t do anything unnatural in terms of range of motion.
As is the case with the squat and bench press, bad form gives the deadlift a bad name. There are many mistakes you can make, but the major “no-no” is rounding your lower back during the lift, as this transfers too much stress from the erector spinae muscles to the vertebrae and ligaments.
How to do deadlift properly?
So, with that out of the way, let’s now learn how to deadlift properly.
1. Setup
Step-1: Start with the bar on the floor
Always start with the bar on the floor—not the safety pins or rack.
Step-2: Narrow Approach
- Your stance should be slightly narrower than shoulder-width apart, and toes should be pointing slightly out.
- You should be standing with the bar at the top of your step, just above the midsection of the feet.
Step-3: Stand straight with the chest out
Stand straight with your chest out, and take a deep breath of air into your diaphragm (not your lungs), bracing your abs as if you’re about to punch in the stomach.
Step-4: Bend at the knees
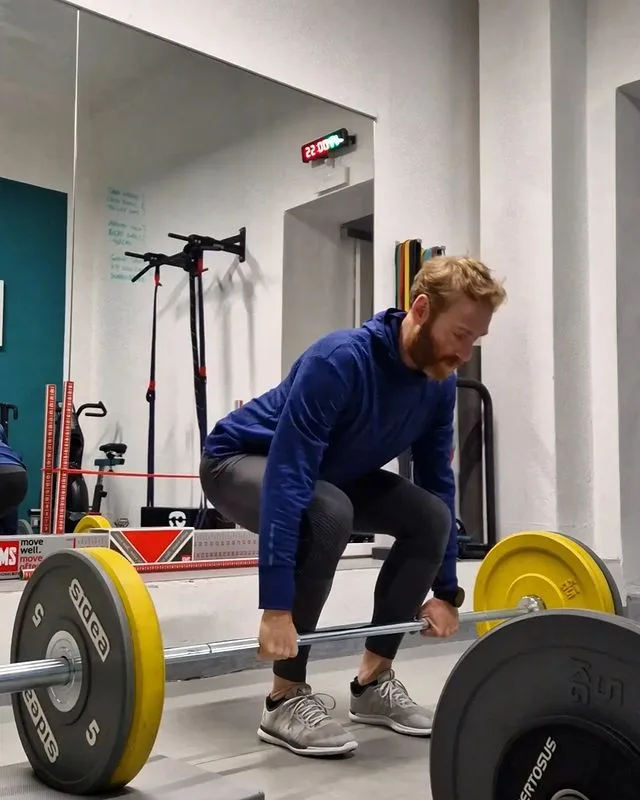
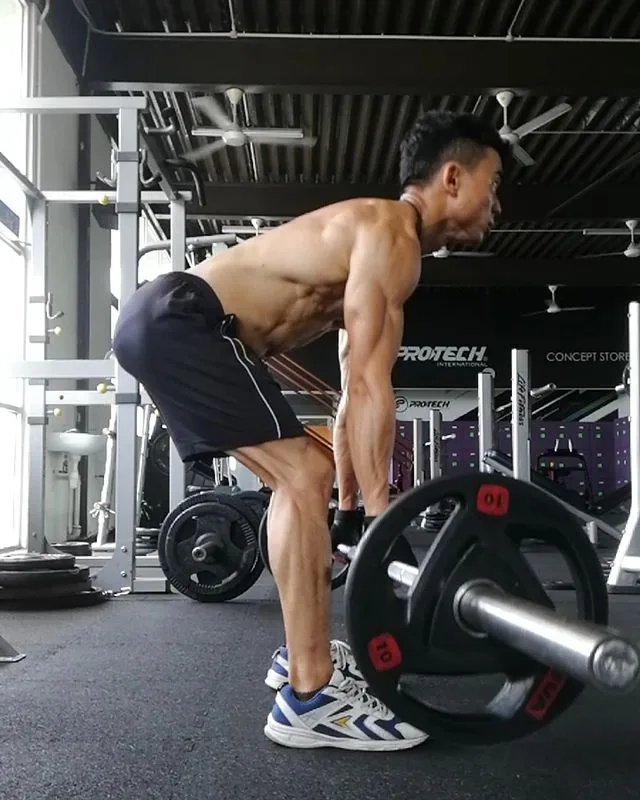
- Bend through the knees until your shins touch the bar and knees slightly past it, and then lift the chest until your back is in a neutral position and tight.
- Don’t lift the lower back, and don’t squeeze your shoulder blades together like in a squat. Just lift the chest up and shoulders up and lower back down.
Step-5: Lower the hips are below optimum
- Don’t make the beginner’s mistake of bringing the hips too low with the intention of adding weight.
- The lower the hips are below optimum, the higher you have to rise before being able to lift the weight off the floor, which is just wasted movement.
- Instead, you should feel tightness in the hamstrings and hips as you lower yourself into what is essentially a “half-squat” position.
Step-6: Arm straight and closed
The arms should be completely straight and locked and just outside the feet, leaving enough room for your thumbs to clear the thighs.
Step-7: Grab the bar
- Grip the bar between your palms, not your fingers.
- To build grip strength, both palms should be facing inwards.
- The other grip option is the “mixed grip,” where one palm is facing in (usually the non-dominant hand) and the other is facing out, which may allow you to lift heavier weights.
2. Movement
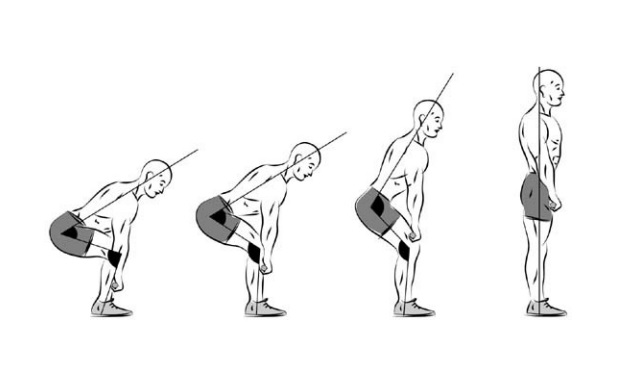
Here’s what the starting position looks like, now you’re ready to pull.
Step-1: Drive the body upwards and slightly backward
- Drive the body up and slightly back as quickly as possible by pushing through the heels.
- Keep elbows locked in place and lower back slightly arched (no rounding!).
Step-2: Hips and shoulders move up together
Make sure the hips and shoulders rise together: Do not lift the hips without lifting the shoulders.
Step-3: Keep the back neutral and keep the entire upper body tight
- As you continue to push up, you’ll feel the hamstrings and hips doing the hard work.
- Keep the back neutral and tight all the way up, and try to keep the bar as straight as possible; There should be a slight lateral movement of the bar as you lift it up.
Step 4: Glutes contract forcefully to bring you to standing position
- The bar should move up your shins and roll over the knees and thighs, at which point the glutes contract forcefully to bring you into a standing position.
- At the top, the chest should be out and the shoulders down.
- Don’t lean back, lower the weight, or roll the shoulders up and back.
Step 5: Lower the weight back down to the floor in a controlled manner
- The next half of the movement is lowering the weight back down to the floor in a controlled manner; yes, it should go back to the floor!.
- It’s basically a mirror image of what you did to come up.
Step-6: First lower the bar by pushing the hips back
- You begin to lower the bar by pushing your hips back first, descending in a straight line by sliding your thighs down until the bar reaches your knees.
- Then you bend the knees and lower the calves.
- The back remains locked in its tight, neutral position the entire time.
Step 7: Don’t try to slow down your weight loss on purpose
Don’t try to intentionally slow the weight down, especially as you bring the bar down to your knees. The entire second half of your lift should take about 1-2 seconds.
Step-8: Next Rep—Tap-and-Go and Stop-and-Go Methods
- There are two ways to transition into your next rep: the tap-and-go and stop-and-go methods.
- In the tap-and-go method, you tap the floor with the plates and go straight into your next rep.
- With the stop-and-go method, you leave the plates completely on the floor for one second before starting your next rep.
- The latter is harder than the former, but not necessarily better. It’s a matter of finding what feels best for you.
- You may prefer the tap-and-go method, but sometimes you may use the stop-and-go method if you’re going particularly heavy.
3. Deadlift tips
- To prevent shin scraping, wear long pants and long socks on the day you deadlift.
- This may be due to poor form, but may also be inevitable depending on the relationship between the limbs and the torso and lower body.
- Like squats, deadlifting, or high heels is a bad idea in shoes with air cushion or gel filling.
- They compromise stability, cause a loss of power, and hinder proper form.
- Buy flat, hard-soled or weightlifting shoes for deadlifting and squatting, and you’ll be better for it.
- If you start with your elbows bent, you’ll put unnecessary strain on the biceps. Keep the elbows straight during the entire lift.
- Stick to an overhand grip if possible, as it’s great for strengthening the grip.
- However, as you get stronger, you may find that the bar starts to slip out of your hands during your sets.
- If this happens, you can switch to an alternate grip and incorporate some grip-specific training into your routine if you wish.
- Too wide of a stance or grip will make the exercise awkward; The deadlift stance is narrower than the squat stance, and the hands should be just outside the feet.
- Try to crush the bar with the grip. If your fingers aren’t white, you’re not pressing hard enough.
- If you start to lift too high with the hips, you’ll turn the deadlift into a stiff-legged deadlift, which is more stressful on the lower back and hamstrings.
- Make sure you have lowered your hips enough to the starting position.
- A common mistake people make is to start climbing slowly, which makes it all too easy to get stuck.
- As quickly as possible, lift the bar off the floor by applying as much force as possible through the heels.
- When you are lowering the weight, if you break the knees too early, you will hit them with the bar.
- To avoid this, first push your hips back and do not bend your knees until the bar reaches them.
- When deadlifting, do not strain to look up, keep the head in a neutral position and keep the spine in a straight line. 3
- Colado JC, Pablos C, Chulvi-Medrano I, Garcia-Masso X, Flandez J, Behm DG. The progression of paraspinal muscle recruitment intensity in localized and global strength training exercises is not based on instability alone. Arch Phys Med Rehabil. 2011 Nov;92(11):1875-83. doi: 10.1016/j.apmr.2011.05.015. PMID: 22032222.[↩]
- Cholewicki J, McGill SM. Lumbar posterior ligament involvement during extremely heavy lifts estimated from fluoroscopic measurements. J Biomech. 1992 Jan;25(1):17-28. doi: 10.1016/0021-9290(92)90242-s. PMID: 1733981.[↩]
- Source: Bigger Leaner Stronger: The Simple Science of Building the Ultimate Male Body. By Michael Matthews. Available here: https://amzn.to/3S7dyYD[↩]


