Squat, when performed correctly and with proper supervision, it strengthens every muscle in the legs, are not only safe, but can be a significant preventative for knee injuries.
Squats strengthen every muscle in your legs, which not only increases the amount of weight you can lift — it also helps you run faster and jump higher, and it improves flexibility, mobility, and agility. And as if that weren’t reason enough to do squats regularly, it’s also an incredibly effective core workout. 1 2 3
A rigorous study by Duke University scientists included an analysis of more than two decades of published literature to determine the biomechanics of the squat exercise and the stress it places on the ankles, knees, hip joint and spine. 4
How to do squats properly?
It’s not easy to squat correctly or through a full range of motion. And good form is important if you want the benefits without the negative side effects associated with performing improperly.
Here’s how to do it right and common mistakes:
1. Proper form, a highlight from the studies
Highlights from the paper, and the many studies reviewed, directly record how the squat affects the body and teach us a lot about proper squat form:
- The hamstrings counteract the pull on the shinbone, which neutralizes the shear force placed on the knee and reduces stress on the Anterior Cruciate Ligament (ACL).
- Even in extreme cases, such as powerlifters lifting 2.5 times their body weight, the compressive forces exerted on the knee and its tendons are within the limits of their ultimate strength. 5
- The stress placed on the ACL is negligible considering its ultimate strength (in one study, the highest ACL force was recorded when squatting at a mere 6 percent of its ultimate strength). The highest recorded PCL forces were within the natural strength range. 6 7
- If you maintain a neutral spine position while sitting (rather than a rigidly flexed position), you greatly reduce the shear force exerted on your vertebrae (your spine is better able to deal with compressive force than shear). 8
- Maintaining a posture as straight as possible further reduces this force, as does increasing intra-abdominal pressure, which you can create by holding your breath while squatting and looking straight ahead rather than down. 9 10 11
In closing, Duke University researchers concluded that the squat “does not compromise knee stability, and may increase stability if performed correctly.” 4
Furthermore, any risk of spinal cord injury can be avoided by reducing the shearing force exerted on the spinal cord.
After its own comprehensive review of the literature, the National Strength and Conditioning Association came to the same conclusion—squats, when done correctly and with proper supervision, are not only safe, but can be an important preventative for knee injuries. 12
So rest assured—As long as you use proper squat form, squats don’t put your back or knees at risk of injury.
The real problem with the squat is that very few people do it correctly. Of course, the most common error is to do partial reps by not lowering the body until the hips are below the knees. However, there are other common mistakes: too narrow of a stance, too wide of a stance, bowing knees, early “butt winks,” and more.
Keep reading this article, the features about it, and it will ensure that you don’t make the same mistakes by breaking the elevator down into its individual parts and analyzing how it works.
2. Back squat setup
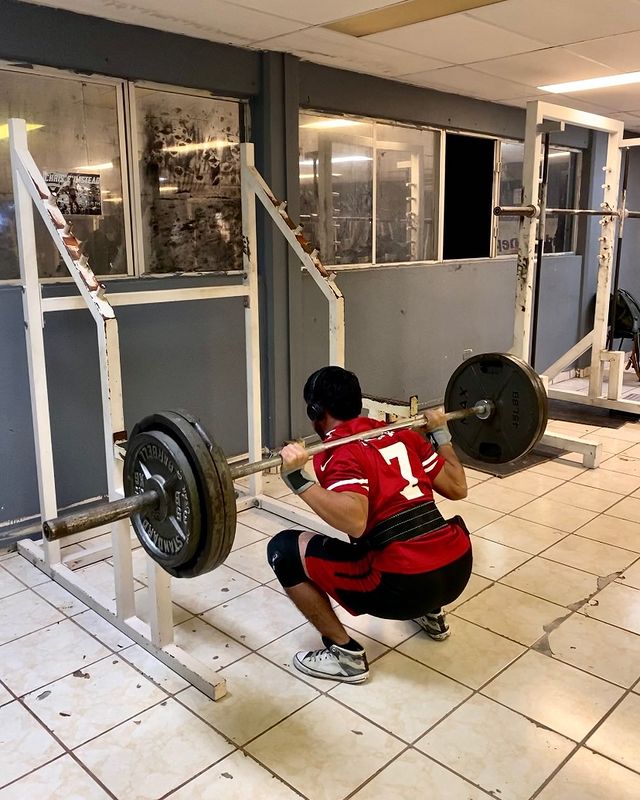
I recommend that you always sit in a power rack or squat rack with six-inch safety bars/pins; Either way below the height of the bar at the bottom of the rep. Do this even if you have a spotter.
Position the bar on the rack so that it cuts across the upper half of your chest. It may feel a little low, but it’s better to keep it on the low side than trying to lift heavy weights off the rack.
Face the bar so that you can walk past it. Never take the bar forward, as it is dangerous to try to drop it again by going backward.
Get under the bar and place your heels about shoulder-width apart, toes turned out about 20 to 25 degrees (right foot should be at about 1 o’clock and left foot at about 11 o’clock).
When you’re ready to open the bar, bring your shoulder blades together, tighten your entire upper back, lift your chest and straighten your lower back. Place the bar under the bone at the top of your shoulder blades, solidly across your upper back muscles and posterior deltoid. Do not put the bar on the neck.
Use a narrow grip because this helps you maintain upper-back tightness, and keep your thumbs on top of the bar.
Notice how all the weight is on his back, with none on his hands. It’s important. The wide grip many people use weakens the back muscles, which provide critical weight support and shift the load onto the spine. Don’t follow their lead.
This tight, hands-on position will probably feel a little awkward at first, and you may need to improve your shoulder flexibility to get there. If you’re not flexible enough yet, that’s okay—get as close to the proper position as you can, making sure your shoulder blades are pinched, and the weights are solidly on your back; you’re not holding the weights in your hands. As you continue to train and stretch, you’ll be able to get your hands closer.
3. Movement
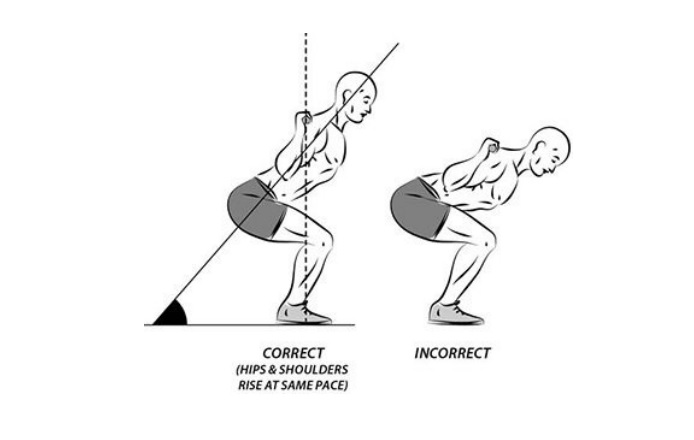
Step-1: Heels shoulder-width apart, toes pointing outwards
Once you’ve unracked the weight, take a step or two back and assume the proper sitting position as described above – heels shoulder-width apart, toes pointed out.
Step-2: Spot on the floor at a distance of about six feet
Pick a spot on the floor about six feet away, and watch it for the entire set. Do not look at the ceiling, as this makes it difficult to reach proper bottom position, can impair proper hip movement and chest position, and can even lead to neck injury.
Step-3: Lift the chest and keep the whole back straight and tight
You are now ready to begin the downward movement, which is accomplished by driving the hips back and squatting down straight, keeping the chest up and the entire back straight and tight.
Step-4: Patellar Tendon Below the Knee Cap
Many people have a tendency to want to shift the weight to the quads as they descend, and accomplish this by driving the knees too far forward. Well, if your knees go too far past your toes when squatting down, they get into a compromised position, which can lead to all kinds of pain and problems, especially the patellar under the kneecap.
Step-5: Forward movement of knees
A good rule of thumb is that the forward movement of the knees should occur in the first third or half of the descent, and they should not go past the front of the toes. Once the knees are out of the way and in place, the movement becomes a simple drop of the hips followed by a lift straight back up.
Step-6: Keep the knees slightly ahead of the toes and the back straight
The low of the squat is the point where your hips are pushed back and slightly lower than your knees (causing your femurs to be slightly less than parallel to the ground). Your knees are slightly forward over the toes and back is straight, but not necessarily arched, and at an angle that places the bar in between the feet.
I recommend that you practice this movement without any restriction. If you want to score bonus points, pose yourself in front of the camera to make sure you’re actually doing what you think you’re doing.
Step-7: Raise the shoulders in the same motion
Once you reach the bottom of the squat, you drive your butt straight up – not forward – and lift your shoulders in the same motion. To do this, you must maintain a back angle that keeps your weight in the middle of your foot. If your hips rise faster than your shoulders, you’ll start to lean forward, which puts a lot of strain on the neck and back.
Step-8: Keep the chest up and maintain proper spine angle
Think of nothing other than driving your hips straight up, keeping your chest up and maintaining the proper spine angle, and you’ll lift off correctly.
4. Front Squat
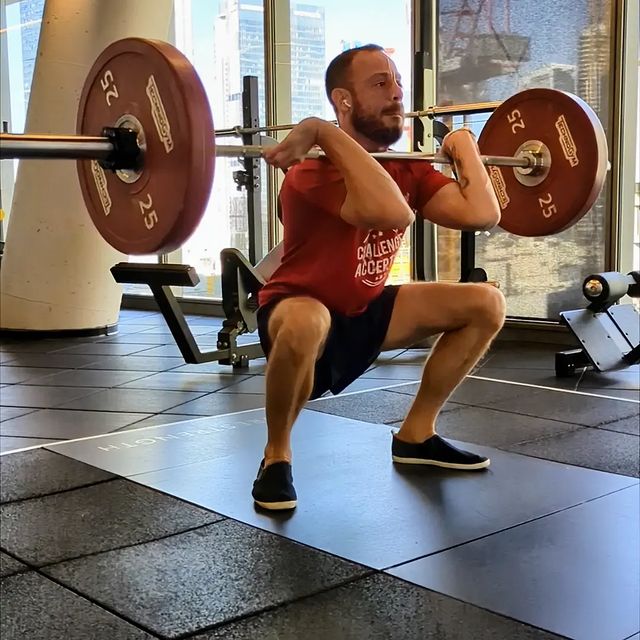
There are quite a few variations of the squat, but most are shorter than the basic movement and thus not recommended—as like back squat and front squat.
The front squat emphasizes the quadriceps and core and creates less compression of the spine and less torque in the knees, which makes it especially useful for people with back or knee injuries or limitations. This also makes it easier to get the proper depth. 13
Like a back squat, you set up for a front squat with your feet about shoulder-width apart and your toes pointed slightly out.
There are different ways to hold the bar, but the position I use for Olympic lifts is known as the clean, which looks like this: 14
- If this puts too much stress on your wrists, you can reduce it by removing one or two fingers, such as the thumb and pinky, from under the bar.
- In this position, the barbell sits in front of your shoulders, requiring that your upper-back muscles work hard to keep your torso upright, and your chest and elbows up and forward. Don’t try to grab the bar above your shoulders with your hands or your wrists will start to ache. It’s uncomfortable at first, but you want your shoulders to be carrying the weight.
- Maintain it tight, vertical position for your entire lift.
- To begin lowering down, take a deep breath and stabilize your core. Push your hips out and squat straight down, keeping your knees in line with your toes, until your thighs are parallel to the ground. You’ll notice that this pushes your knees forward a bit more than the back squat, which is normal.
- Drive through your heels to begin the climb and keep your chest up, back tight and elbows high.
- Comfort P, Haigh A, Matthews MJ. Are changes in maximal squat strength during preseason training reflected in changes in sprint performance in rugby league players? J Strength Cond Res. 2012 Mar;26(3):772-6. doi: 10.1519/JSC.0b013e31822a5cbf. PMID: 22310512.[↩]
- Hartmann H, Wirth K, Klusemann M, Dalic J, Matuschek C, Schmidtbleicher D. Influence of squatting depth on jumping performance. J Strength Cond Res. 2012 Dec;26(12):3243-61. doi: 10.1519/JSC.0b013e31824ede62. PMID: 22344055.[↩]
- Shinkle J, Nesser TW, Demchak TJ, McMannus DM. Effect of core strength on the measure of power in the extremities. J Strength Cond Res. 2012 Feb;26(2):373-80. doi: 10.1519/JSC.0b013e31822600e5. PMID: 22228111.[↩]
- Escamilla RF. Knee biomechanics of the dynamic squat exercise. Med Sci Sports Exerc. 2001 Jan;33(1):127-41. doi: 10.1097/00005768-200101000-00020. PMID: 11194098.[↩][↩]
- Nagura T, Dyrby CO, Alexander EJ, Andriacchi TP. Mechanical loads at the knee joint during deep flexion. J Orthop Res. 2002 Jul;20(4):881-6. doi: 10.1016/S0736-0266(01)00178-4. PMID: 12168682.[↩]
- Escamilla RF, Fleisig GS, Zheng N, Lander JE, Barrentine SW, Andrews JR, Bergemann BW, Moorman CT 3rd. Effects of technique variations on knee biomechanics during the squat and leg press. Med Sci Sports Exerc. 2001 Sep;33(9):1552-66. doi: 10.1097/00005768-200109000-00020. PMID: 11528346.[↩]
- Toutoungi DE, Lu TW, Leardini A, Catani F, O’Connor JJ. Cruciate ligament forces in the human knee during rehabilitation exercises. Clin Biomech (Bristol, Avon). 2000 Mar;15(3):176-87. doi: 10.1016/s0268-0033(99)00063-7. PMID: 10656979.[↩]
- Noyes FR, Butler DL, Grood ES, Zernicke RF, Hefzy MS. Biomechanical analysis of human ligament grafts used in knee-ligament repairs and reconstructions. J Bone Joint Surg Am. 1984 Mar;66(3):344-52. PMID: 6699049.[↩]
- Race A, Amis AA. The mechanical properties of the two bundles of the human posterior cruciate ligament. J Biomech. 1994 Jan;27(1):13-24. doi: 10.1016/0021-9290(94)90028-0. PMID: 8106532.[↩]
- Vakos JP, Nitz AJ, Threlkeld AJ, Shapiro R, Horn T. Electromyographic activity of selected trunk and hip muscles during a squat lift. Effect of varying the lumbar posture. Spine (Phila Pa 1976). 1994 Mar 15;19(6):687-95. doi: 10.1097/00007632-199403001-00008. PMID: 8009334.[↩]
- Dionisio VC, Almeida GL, Duarte M, Hirata RP. Kinematic, kinetic and EMG patterns during downward squatting. J Electromyogr Kinesiol. 2008 Feb;18(1):134-43. doi: 10.1016/j.jelekin.2006.07.010. Epub 2006 Oct 6. PMID: 17029862.[↩]
- N.S.C.A. POSITION PAPER: The Squat Exercise in Athletic Conditioning. National Strength and Conditioning Association Journal: October 1991 – Volume 13 – Issue 5 – p 51-58[↩]
- Gullett JC, Tillman MD, Gutierrez GM, Chow JW. A biomechanical comparison of back and front squats in healthy trained individuals. J Strength Cond Res. 2009 Jan;23(1):284-92. doi: 10.1519/JSC.0b013e31818546bb. PMID: 19002072.[↩]
- Source: Bigger Leaner Stronger: The Simple Science of Building the Ultimate Male Body. By Michael Matthews. Available here: https://amzn.to/3S7dyYD[↩]


